Automata Measurement Tools
For the most part automata measurement tools aren't very complex. It is likely surprising to some that during my work I only seldom utilize the standard tape measure. For anything under a foot I use a steel rule. I usually only use a tape measure when marking stock to build cases. It is important to remember that I use CAD to create templates for a lot of my automata pieces, so a lot of dimensions is done there and translated to the project on paper.
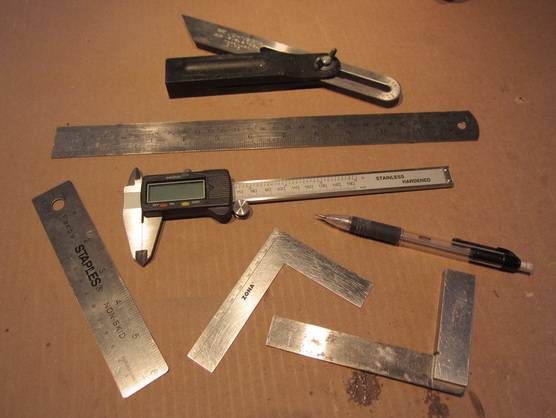
Here's the main measurement tools I use around my shop.
Here's the main measurement tools I use around my shop.
Measuring Length, Width, Height and Angles
Lets run through the basics shown above.
Steel Rules
I keep a bunch of stainless steel rules from 12" down to 3" in length. Most are wide but I have a few narrow ones for sticking into tight spaces. The photo shows a six inch and a 12 inch rule. I prefer them to tapes for a couple of reasons. They do not bend, they lie flat on the measured surface, clean easily and come in assorted units and divisions. I have lots so I never have to look too hard for one!
Steel Squares
I use two types of squares, both are shown above. The flat one is good for marking and measuring when doing layouts as well checking alignment during assembly. I use two sizes of these squares, a 4" and a 7". I often use then to measure distance from flat surfaces since markings start right on the ends, and they are more easily held in place than a steel rule. You have to have some of these.
The second type is more like a carpenters square with a shoulder on it. I use a small machinists square the most although I have several larger others. I like it to use it to align pedestals when glueing them onto base plates. You need a miniature one like the one shown above for sure. Remember you a making little things and need little tools.
Marking Pencils
I use .5mm mechanical pencils for marking projects during assembly since they give a fairly precise line. Seldom do I mark with a blade although I have them available in my shop. Go figure!
Digital Caliper
Use this to measure the diameter of brass rods or even wooden dowels if necessary as well as other brass shapes. Also handy to measure the inside dimensions of components where the caliper will fit.
Sliding Bevel
Sometimes I need to adjust my designs as I go. A sliding bevel is a great way to measure the relative angle of two surfaces. The angle can them be directly copied or measured with a protractor on the bevel itself. Handy when you need it, but not used frequently.
Measuring Weight
Occasionally I need to know the weight of automata components. Most often this is for determining the amount of counter weight required to get a movement to return to it's rest position. I try to estimate the amount of wood I need in a counterweight when I design it although sometimes I know the space is limited and wood alone will not be sufficient, or often I just get it wrong! In these cases I attach temporary weights during assembly until I get things working to my satisfaction, remove them and determine their wait using a small electronic kitchen scale. I can then determine how much metal weight I need to add to replace the temporary ones. I just need to figure out where to put it and how to attach it. The scale is a great tool when you need it.
