|
The bees are now inhabiting the hole in the wall where the automata is. A few are in the nest while others have found other locations to hide in. I still have not revealed the entire story of the automata so I won't show you where they all are as it might give things away. I am hoping you will get a real lift out of the automata when you see it, or at least it pushes your buttons! Oops I guess that was a bit more of a clue! Hmmm!
0 Comments
I make the wings from a thin sheet of Lexan cut to shape on the scroll saw, using a fine blade and cutting slowly. If you move to fast the Lexan will heat and melt but re-fuse itself behind your blade. Slow and steady is the name of the game when doing this. If you are shy of scroll sawing, these little Lexan can be cut at least partial cut out with scissors. You can see the shape of the wing in the photo below.  The key part in the fitting here is to sand a small flat surface on the back half of the top of the thorax, sanding it down to expose wood under the paint. This is to provide a good bonding surface for the glue. Try to have the front edge of the flat as straight as possible so the wing can butt up directly to it. You will need some patience for the next bit, especially if making a bunch of bees at one time, so be prepared to take your time and take a few mental breaks. Use some medium CA glue to glue the under side of the wing to the exposed wood. Hold the wing firmly in place until the CA glue is set. You can use a bit of accelerator but is not likely to get under the wing to where the bulk of the glue should be. You just have to be patient and hold it until it sets. When the wing is stuck in place mix a little epoxy to place on the top side of the wing spreading it around the edges of the wing. to contact the thorax, building a small bump which will cover the area of wooden exposed when sanding the flat for the wing. When the epoxy is set rough it up a little with fine sandpaper and paint it the colour of the bee's body. Hopefully the series of photos will help you to see the steps.
 Wings on. Paint touch up done. Add a little varnish on the new paint spots to finish. Ta- Da! Now it is time to relax. Sit in front of the TV or have some of your favourite tunes playing on your favourite streaming service, get your acrylic paints out and brush away! Paint your abdomens yellow and everything else black, or dark brown, your choice, and then go back and paint the black stripes on the abdomens. The next step is to paint is the eyes. The eyes on these bees are positioned high on the edge of the head on little flats created when finishing. Let's talk about the eyes for a moment. I always try to paint deliberately human looking eyes on whatever creature I make for an automata. I feel it is a chance to add personality to a character. The location of eyeballs and the position of the pupils can convey an emotion or action to the benefit of the story being told. In this case the eyes are small and only a pupil made of a little black dot can be used to communicate with the viewer. But I go back to the belief that a human eye often endears a character to an observer . Think how hard it would be to convey any emotion through the compound eye that is actually found in bees! At this point I apply a coat of matte acrylic varnish to every surface I've painted but..... it's not over yet. The matte varnish will make it easier to clean your project should it later get covered in dust and also make all surfaces the same level of reflectiveness. But hold on there; to complete our swarm the next step for these bees will be to add wings, and of course with cutting them in there will be a touch up with the dark paint and matte varnish again!
I like to use brass rod to make the legs for the bees. It is strong, yet easy to bend to shape, and can stand numerous adjustments before failing. It is easy to attach by simply drilling a hole in the body the same diameter as the brass rod to be used, and firmly pushing it in. I use a drop of CA glue in the hole prior to insertion to help secure it in place, and another small drop at the surface after it's installed. With the glue all set I can now bend the legs to shape, cut off any extra length, and dull the free ends. The finish paint and following matte varnish sealer also serves to help secure the legs in place.
The same process is used to attach the antennae on the head. Both the antennae and legs are made with 1/32" diameter rods/wire. As before these holes are made with a drill bit in my Dremel tool because it gives more control, holding the bee in one hand, and the Dremel in the other.
 A bunch of bees with brass bits installed, ready for paint. Notice the evidence of CA glue around the antennas and legs. Making these little bees out of wood is a little challenging. The pieces are fairly small and a difficult to hang onto sometimes. I will admit that I have had small bits fly out of my hand while sanding with a Dremel tool while making these. Usually this results in a loss of production time while crawl around the floor looking for where they have landed. I often make a couple of extra pieces just in case they can't be found. This seems easier than keeping my shop spotless ! That said, let me show you how I make Billy bee bodies!  To the right is the pattern I made for myself. It's not fancy. Each body is made from a 1/2" diameter wooden ball for a thorax and two other pieces made from scraps from my wood bin for the head and abdomen, added on opposite sides of the ball. The design is a little excessive. These bees are very rugged. In a large part it is so they fit in with the construction style of the rest of the automata piece. There is no templating used here, just this little sketch and freehand drawing profiles onto the stock. The sketch does not so show the wings just to keep things simple for the time being. You will see how I add them later.
Next, it's time to prepare to put a few things together. I sand a small flat on the end of each section as a gluing surface and drill a small hole in the centre to insert a pin for strength before gluing them together. The photos below show the process. The trickiest operation is to sand a flat on the 1/2" balls. Hold them securely with pliers and sand about a 1/4" diameter flat. This is really where you can launch a 1/2" diameter projectile across the shop if you are not careful. Notice that I did take the photos with the 1" belt sander turned off! For the abdomens you can just hold the pieces with your hand, but still be careful and try to keep things perpendicular . The last thing to do is to drill a 1/16" hole in the centre of the flat. I use my Dremel tool to make drill these holes - more control!
Below is what things look like just before the first stage of glue up. You can see a collection of abdomens and the thoraxes ( small balls ) ready with holes in the ends and short pieces of brass rods inserted to act as stiffeners. I use a small dab of quick set epoxy to glue the pieces together. I use epoxy not only for strength but because it sets quickly so It allows me to keep moving onto the next steps of assembly quickly rather than waiting for glue to set. It may be overkill, but it also creates a nice filet between the pieces if it is smoothed slightly while setting.
Now, it is on to adding the heads. They are the smallest piece of the body assembly so I add them differently has they are tough to hold and shape. First, I cut the rough shapes from a scrap of wood after drawing a freehand shape on it. Below you can see 12 heads drawn of the stock ready for cutting. In the next photo you will see a 1/16" hole on the back of each head where the pin will go on the flat back side. I then cut the side of the head shapes on the vertical plane. Next I roughly shape the portion that will form the joint with the wooden ball. After sanding a flat on the ball directly opposite the other side, as shown in the third photo, I then glue the partially shaped head on the thorax. I do this simply so I will have something to hang onto to while I finish the shaping of the rest of the head. Now just finish shaping a little flat area on the upper side of the face for the eyes. finish sanding the head and move on!
Below you will see now I have 12 bee bodies, roughly shaped and ready for a final sand. The two assemblies in the bottom right of the photo are the bees that will be placed into the nest, one facing out, and one facing in. The cylinder sections of these are so there is a good gluing surface for inside the comb. For all the others you will see I drilled a 1/16" hole in the bottom of the thorax , where I will insert a short brass rod to use as a mounting post.
The next blog post will be about adding the fine brass wire that be the legs, stinger and antennae of the bees. I prefer to attach these pieces prior to painting. While you may not be in the market for a swarm of small bees,I hope you find it interesting to observe the techniques I use to make this small "bit of bling" for my project.   Having completed Billy as my bee prototype, I switched over to making a nest for Billy and his friends. As stated in an earlier entry the nest will be fashioned after a mud dauber wasp nest, not a traditional bee hive comb. I am placing it into a corner in the right side of the automata space formed by two wooden surfaces. I am hoping to have it come out looking somewhat like the nest pictured at the right. I dug through my box of carving block cutout pieces and found an irregularly shaped piece that could suit the purpose. I then laid out several 9/16" diameter holes to serve as the cells. Chambers in nests in this from are generally round rather than octagonal. This was another reason for choosing this style - it is easier to make! I drilled the holes about 1" deep on a semi-regular pattern and used the irregular shape to have one protruding forward a bit more than the others for visual interest. There will only be a couple of bees in the nest. At 9/16" in diameter the holes allow a snug fit for a 1/2" diameter body size. Bees that will be placed in the nest will be "one half" bees seeing as you would be unable to see half their bodies in place. Watch for these in a later posting. I might also seal a couple of cells as in the photo above. Below is the picture of the nest I started drilled and sanded to shape. This nest is not a key element of the automata story so I put only a little detail into its detail. In the photo below the left side end of the nest will attach to the ceiling , the rear side will attach to the side wall, and the bottom will attach to a wood beam inside the automata.  Rough-in of nest block
I mentioned last blog that I was adding a bit of "bling" that might be in character with an automata built into the walls of a house. What could be more appropriate for a house in rural Ontario than have a few bees hanging around snooping in cracks and building nests. Bees were a natural choice as we have had bees nest in trees and in underground burrows on our property, along with assorted wasp's nests hanging around outside on buildings. You can also go back into my Automata Gallery page and look up a project called "DJ's Bee Bop Palooza" that I made for a relative in the honey business. Those bees were much bigger than the ones I am undertaking now, since they involved moving parts. They were about 3-1/2" long if I remember, but these stationary ones will be only about 1-1/4" long, scaled to somewhat fit in with other characters in the automata. The first step was to figure where they would go. I decided some should be added to moving parts in the automata to give some a sense of motion while others will be scattered around the automata in stationary positions. I imagine myself challenging young visitors to see how many bees they can spot to further engage them in the automata. I also think that a small comb/nest could provide a potential grouping arrangement. So I examined my mechanism and picked my spots and I set out to build my fleet , or should I say swarm, of bees. DISCLAIMER: I have taken a little liberty here. The nest I have made will appear more like a mud wasp nest we often find than the traditional honeycomb most bees we are familiar with make. In fact, most bees nests in walls end up shaped like large elephant's ears and are quite a size. So I apologize to the die-hard apiarists (bee keepers) out here in advance, but it just wasn't going to be. ( No pun intended!) Alright, the first thing I did was to make a prototype. Here is Billy #1 shown below.  Billy's mounting is a little different from the rest. He will be mounted on a turning wheel and needed an adjustable clearance, so he was made mounted on a small threaded rod. In this way I could adjust him to the height I wanted. When Installed you will not see the rod at all as it will be hidden behind a wheel. I also did not want him to fly off his mount due to centripetal forces!
His thorax is a 1/2" diameter wooden ball from a craft shop. His abdomen is made from a scrap piece of tupelo shaped by hand with a maximum outside diameter of 1/2". HIs head is also shaped from scrap tupelo. I use tupelo because it is light and easy to shape and sand. I use of combination of Dremel sanding and hand sanding to finish. Billy's wings are 1/32" thick pieces of Lexan cut out on a scroll saw, and all his legs and antennae are made from brass wire secured in holes with CA glue before painting. In the next blog I'll show you the steps in making the bees and nest. Okay, so what have you been working on for so long you ask? I am not going to come straight out and tell you but rather create a bit of mystery for you chew on.
I created an automata that has become part of the new house. Yes it is actually built into the structure. I decided it was a good way to self commemorate my automata work and provide a bit of a legacy. That sounds a little egotistical dosen't it! If nothing else it should provide a little amusement for any visitors to our place. I'm sure the mystery project will have its ups and downs until the final bits are added to complete it and I will say that it includes an arachnid, rodents, and insects, all magically activated by people's movements! Oh and did I say it is built inside a wall? Okay that's enough for now! My next blog in a day or two will show you how I am making a "bit of bling" to add to the project. Talk at you later, Al Well I'm somewhat embarrassed that my last blog entry was in July 2022, but things took a momentary turn in another direction for a bit. For those who may have been followers of my blog in the past I feel like I owe some explanation for my absence. In my last entry in 2022 I mention that we were busy doing site clearance for our new residence on Balsam Lake. This included dismantling my workshop and removing several other potential work areas on the property. I did mange to convert a boathouse into my new shop, but it quickly got loaded with many of my completed projects and a conglomeration of tools and bits from everywhere else on the property.
I recognized, reluctantly, that I would likely be heavily engaged in the building project on site and as such I was likely not going to accomplish much automata work. In the fall of 2023 I turned over my shop area to my general contractor so they could store tools and parts, and have a warm break area so construction could proceed through the coming winter. It was complete with a microwave, internet access, a coffee maker, and a gas fireplace. What could be better. But it was going to be crowded, so I limited myself to working on only one automata project during construction trying to stay out of the way the builder. (More on that project in the next blog!) Well here we sit in February of 2024 having moved into our new house just prior to Christmas. January has been consumed recovering possessions from 3 separate storage locations and unloading furniture and boxes into the new house. It should be no surprise that it still is a work in progress! Anyway life is returning to normal despite having to deal with an abnormal amount of snow this year. It seems like we have had to shovel a fresh dusting everyday. The Post Office phoned to say that they would not deliver our mail anymore because their delivery vehicle could not get close enough to our mailbox because of the snow bank! So much for that, "Through rain or snow or rain or......" thing. Yet another distraction from automata work! Anyway I'm sure you are more interested in things automata that what I have been doing in my life, and believe me there is more, but I am back working and will get back to sharing my work with you through this blog. Al It has been a little hectic here so far this year. We are engaged in serious elder care, trying to clean up some of the property of years of accumulated marina stuff, entertaining grand children and getting a little automata project work done. Oh yes, let's not forget the trip to Morristown for AutomataCon 2022! I am slowly working away on a new project using some found items. I was inspired by some of the pieces I saw in Morristown this year so I decided to give it a try. While clearing out the marina storeroom I discovered a pair of deck vents from an old cruiser on the shelf. A little voice in my head instantly yelled out FISH! and so my "found item" project was born. The scoops are from an old Hackercraft, a popular luxury mahogany boat brand still in production today, but these pieces are likely 1950's vintage. Two scoops together will form the head of my leviathan, which will allow me have the mouth open to reveal deep secrets inside.I am adding some wooden lips for interest to each and might lead to the addition of some teeth. The photo below shows one of the scoops beside the start of the lip assembly - still lots of work to go. 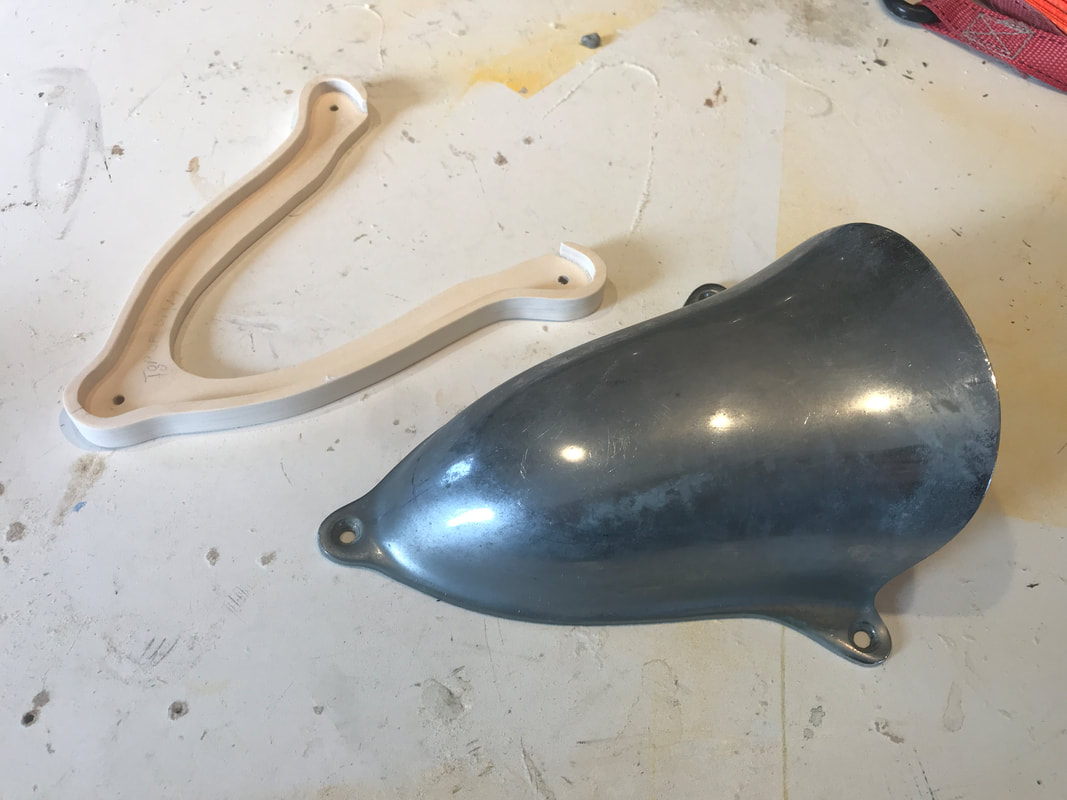 Vent and lip assembly 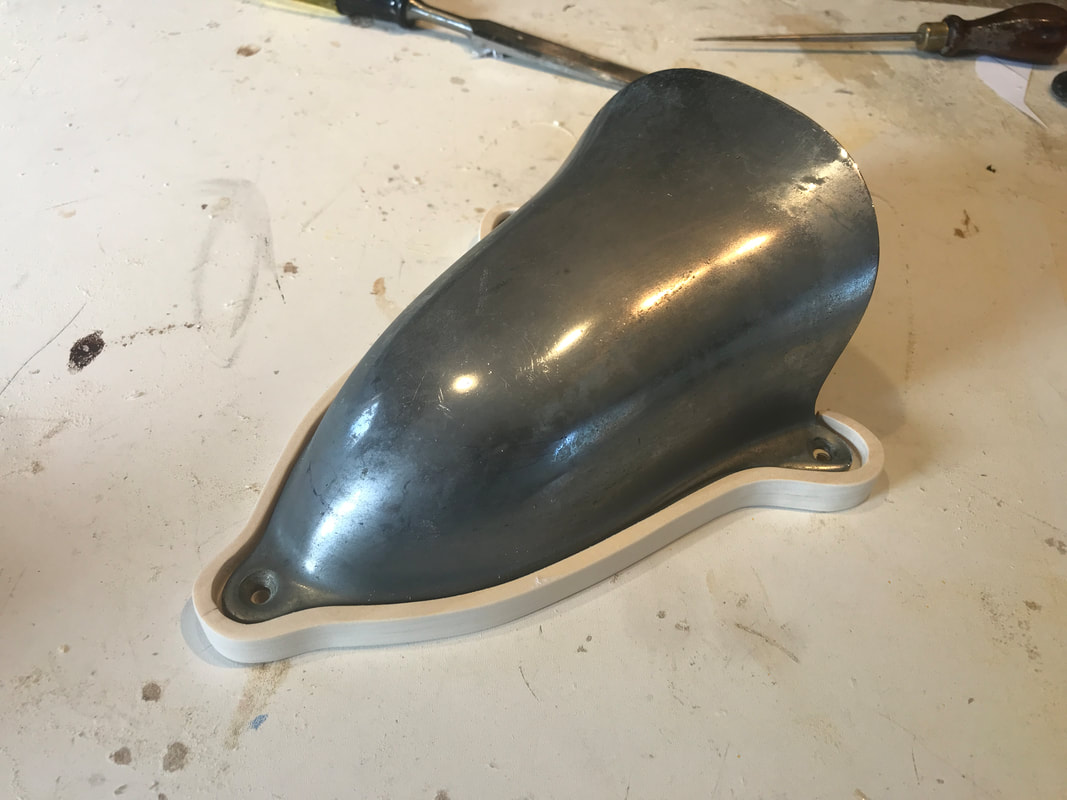 |
Why Automata?Automata is a creative blend of my life interests , engineering, art and woodworking. Archives
October 2026
Categories
All
|


 RSS Feed