|
It has been a little hectic here so far this year. We are engaged in serious elder care, trying to clean up some of the property of years of accumulated marina stuff, entertaining grand children and getting a little automata project work done. Oh yes, let's not forget the trip to Morristown for AutomataCon 2022! I am slowly working away on a new project using some found items. I was inspired by some of the pieces I saw in Morristown this year so I decided to give it a try. While clearing out the marina storeroom I discovered a pair of deck vents from an old cruiser on the shelf. A little voice in my head instantly yelled out FISH! and so my "found item" project was born. The scoops are from an old Hackercraft, a popular luxury mahogany boat brand still in production today, but these pieces are likely 1950's vintage. Two scoops together will form the head of my leviathan, which will allow me have the mouth open to reveal deep secrets inside.I am adding some wooden lips for interest to each and might lead to the addition of some teeth. The photo below shows one of the scoops beside the start of the lip assembly - still lots of work to go. 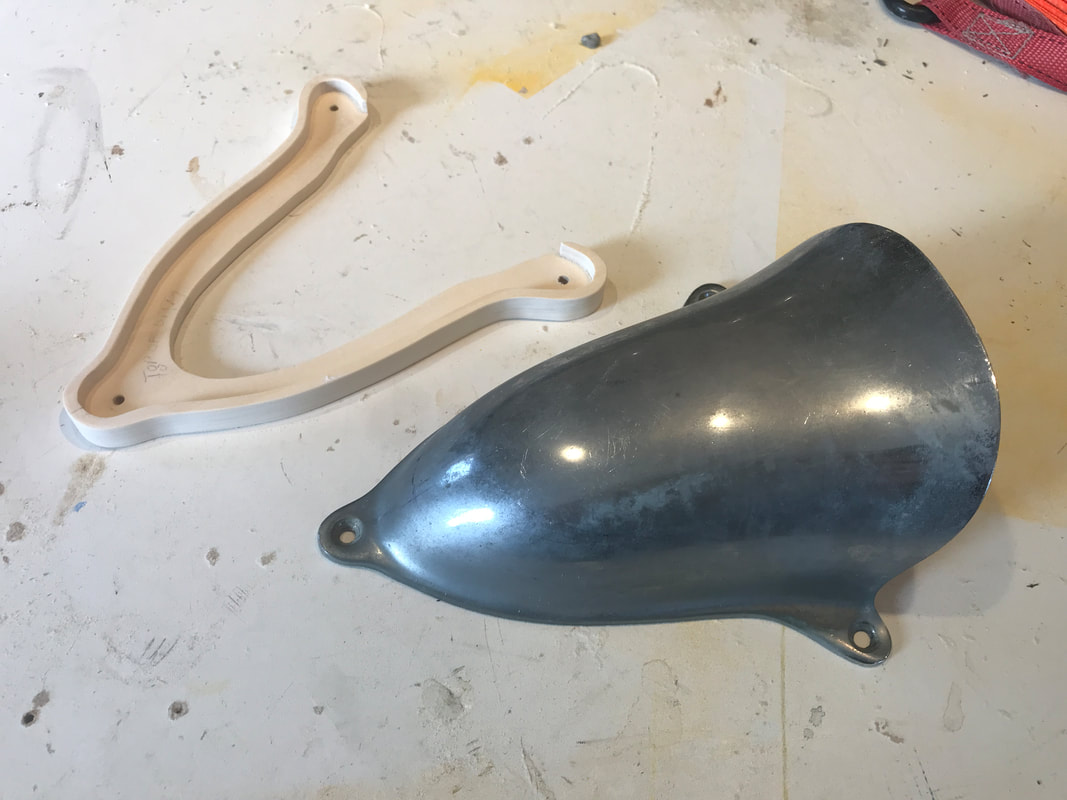 Vent and lip assembly 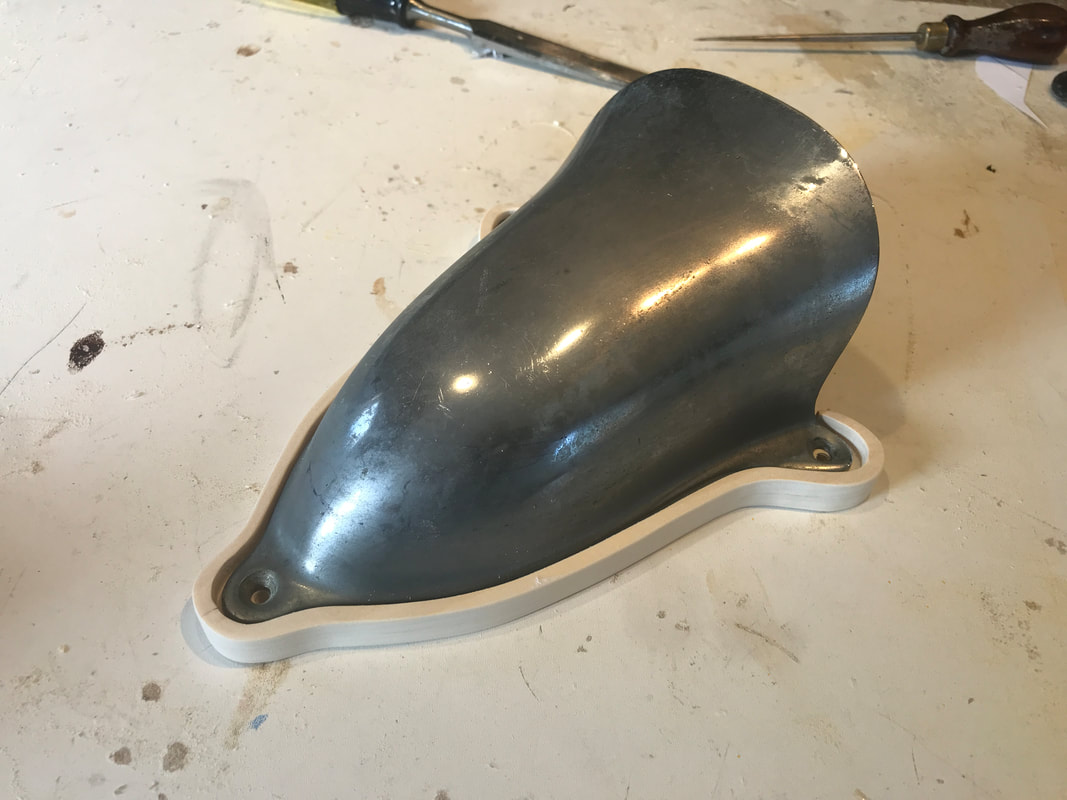
0 Comments
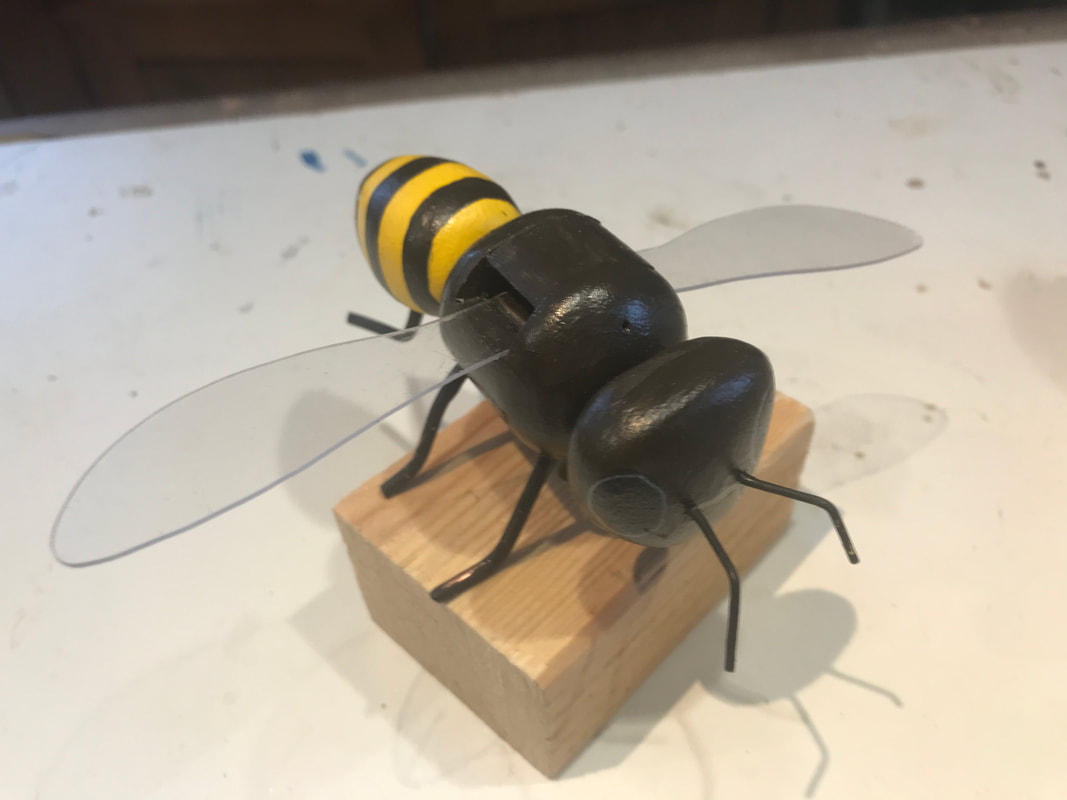
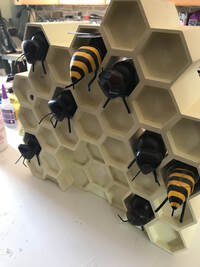
Still more blog entries to catch up on with this project, but my latest automata, DJ's Bee Bop Palooza has now been posted in the Automat Gallery on the website. A description of each of the bees will be added soon as an appendix page.
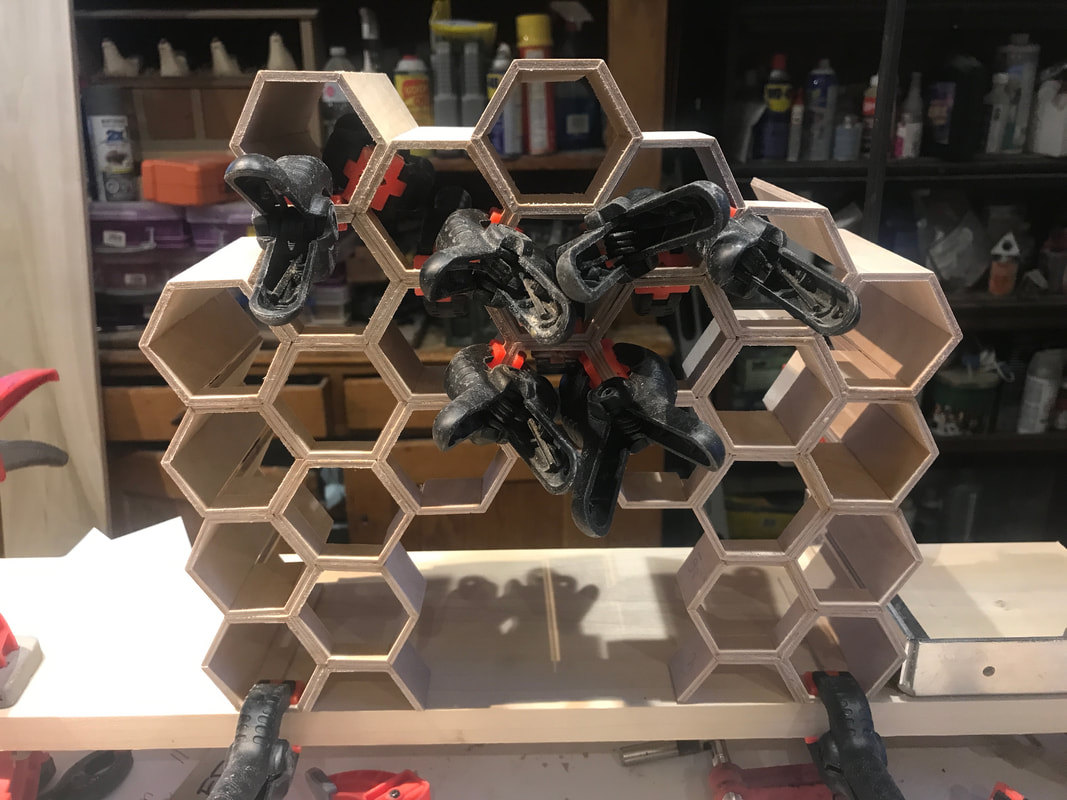
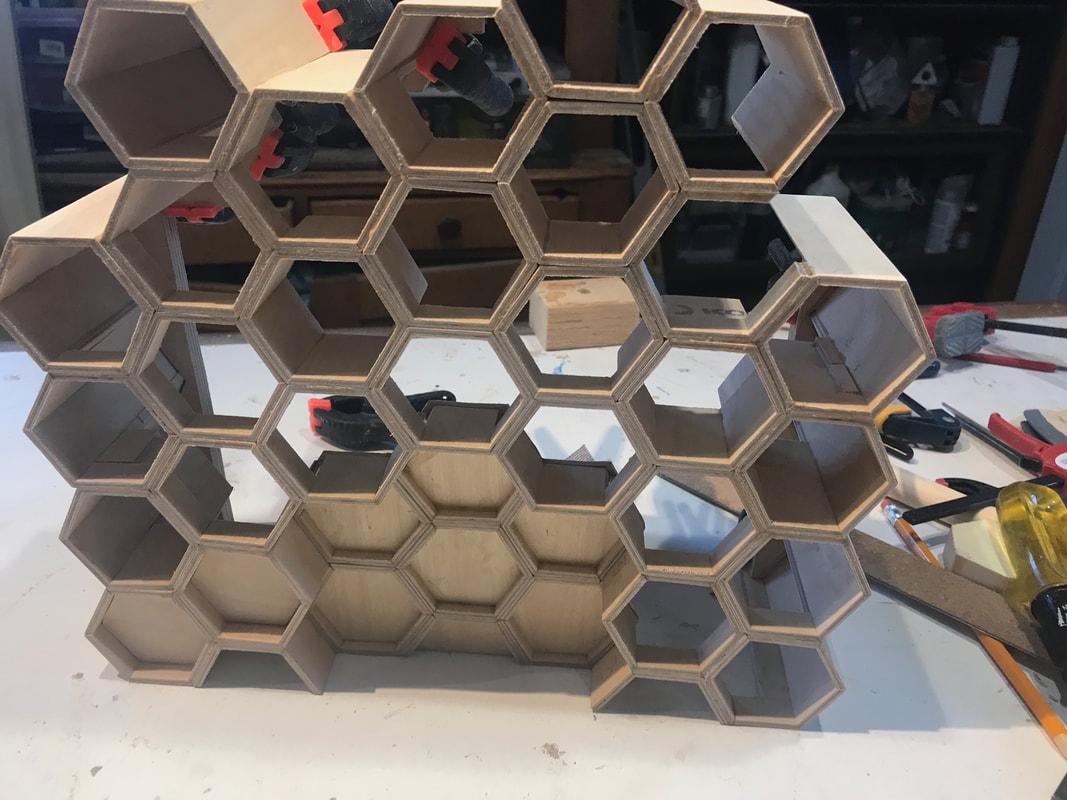
Well I have some bees, at least bits and pieces of some, so now I need a place for them to hang out, shake rattle, and roll! The most natural thing would be to have them in a honeycomb. How to build one required a little thought. I wanted to have cells of varying depth to accommodate the different bee bodies, and a little alcove in the area in the front of the comb. I set out to make individual hexagonal tubes of varying lengths to stack together to make the comb. This will require some repetitive precision as hexagon shapes are strong and not pliable. Thats why they are used to make many structures like buildings and domes. After some laying out each cell to determine its configuration I set out to make the individual shapes. The cells without bees in them will be only 1/2' deep. The depth of the comb will be 4" which should be enough space to hide the internal mechanism. Many have irregular length sides in order to fit together. I need 29 of them in total! Yes it took a while. I cut the material for the sides from 1/8" birch plywood cutting a 30 degree bevel on both sides. Then I cut the sides to the required length and applied glue, jiggled them into squareness and applied elastics to apply a uniform clamping pressure around the cell body. They are 1-3/4" across the inside of opposite sides. Here's a photo of some of the early assemblies. 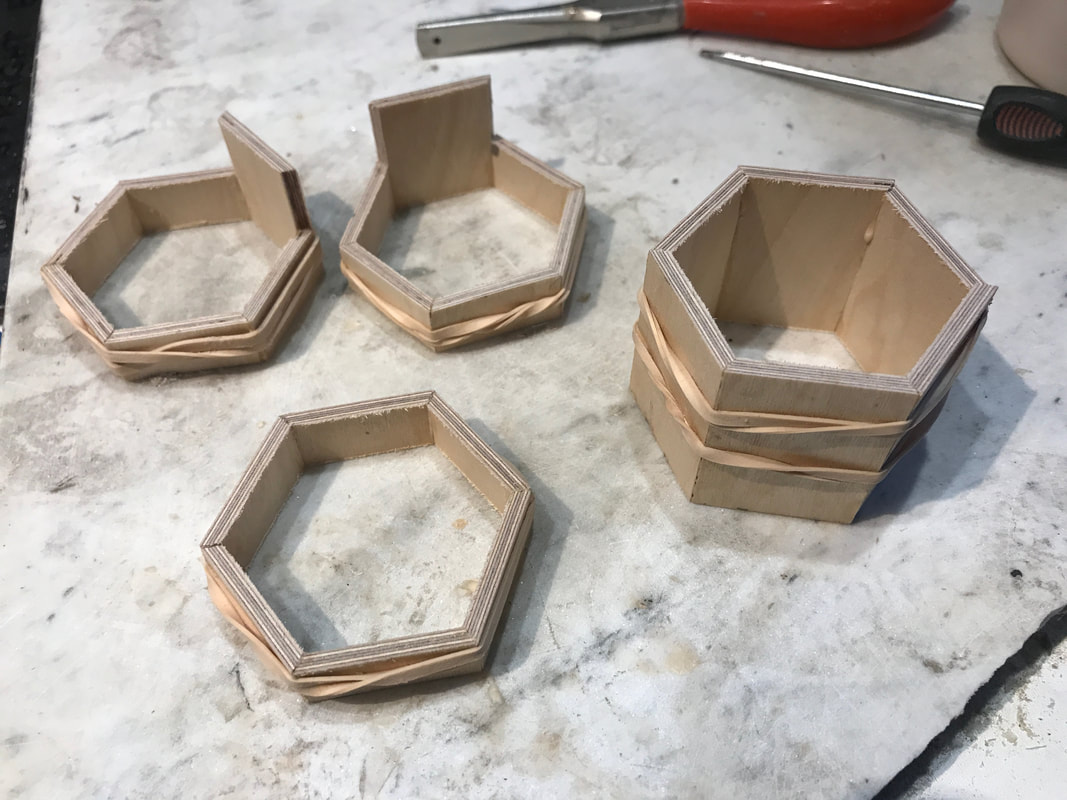 Some plywood honeycomb cells with elastic clamps in place! Well as you might guess the next step is a lot more of the same. Eventually I started clamping them together just to make sure that all 29 cells were as I wanted them. Them I started gluing them together, building the two outer sides from the bottom up and eventually joining them together in the centre.
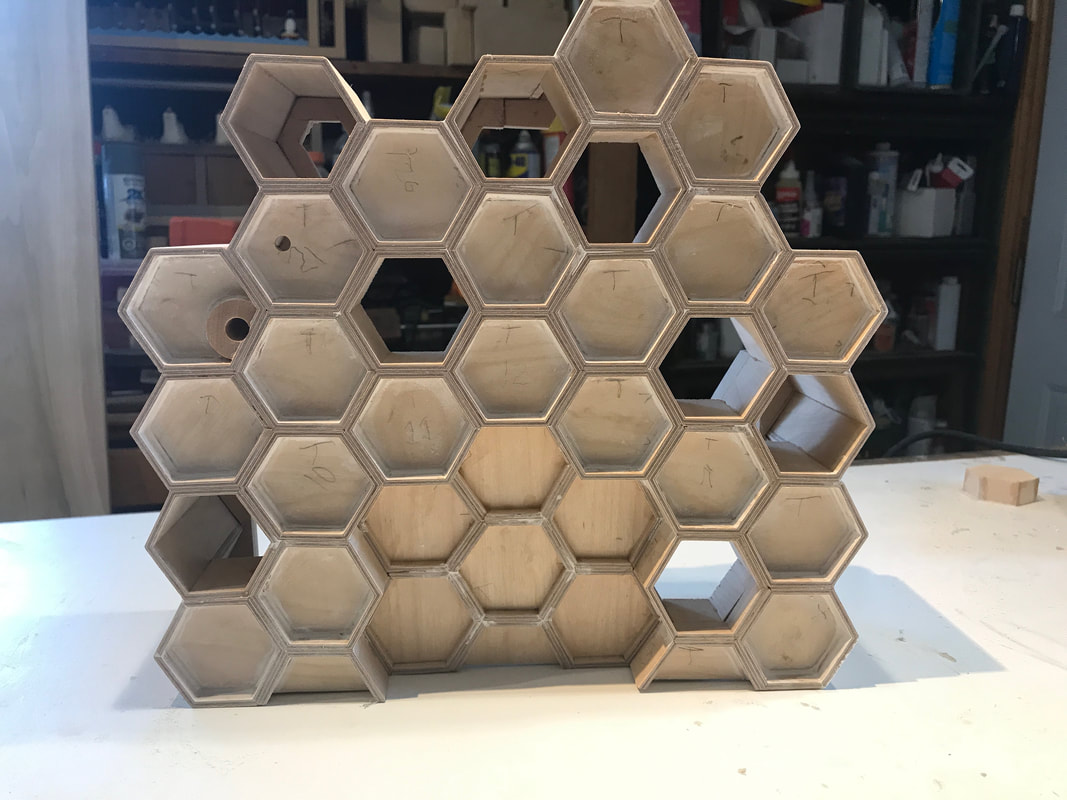
After what seemed like days, it began to fill out until the empty cells were with plywood plugs and the cells for the bees were left open.. The two holes in the cells on the left side are for actuator mechanisms.
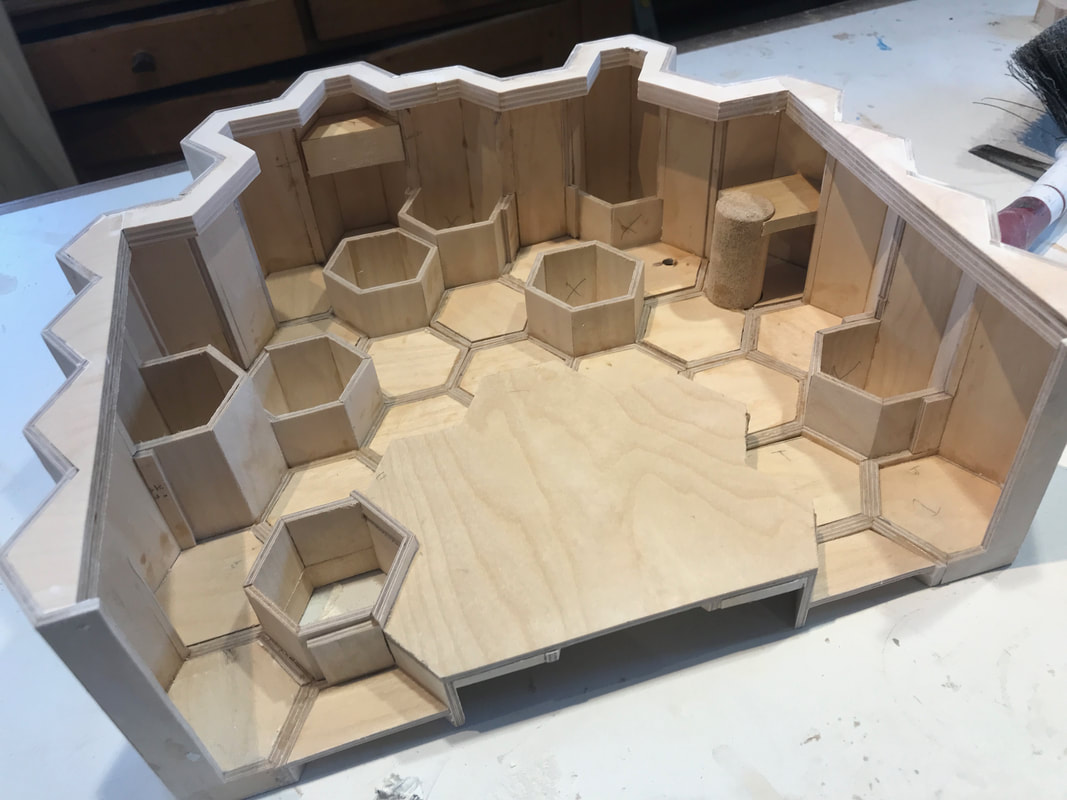
Below is a view from the back that shows the area where the linkages will run up from the mechanism below.. I put a stiffener around the back edge to add some extra rigidity. The large panel a the bottom is the back of the alcove area on the front. After a quick coat primer paint I can't resist throwing some bees in to see whether it looks like what I imagined it should. I'm satisfied so I keep on going! Its a good thing since I had invested a lot more time on the comb than I thought I would need to.
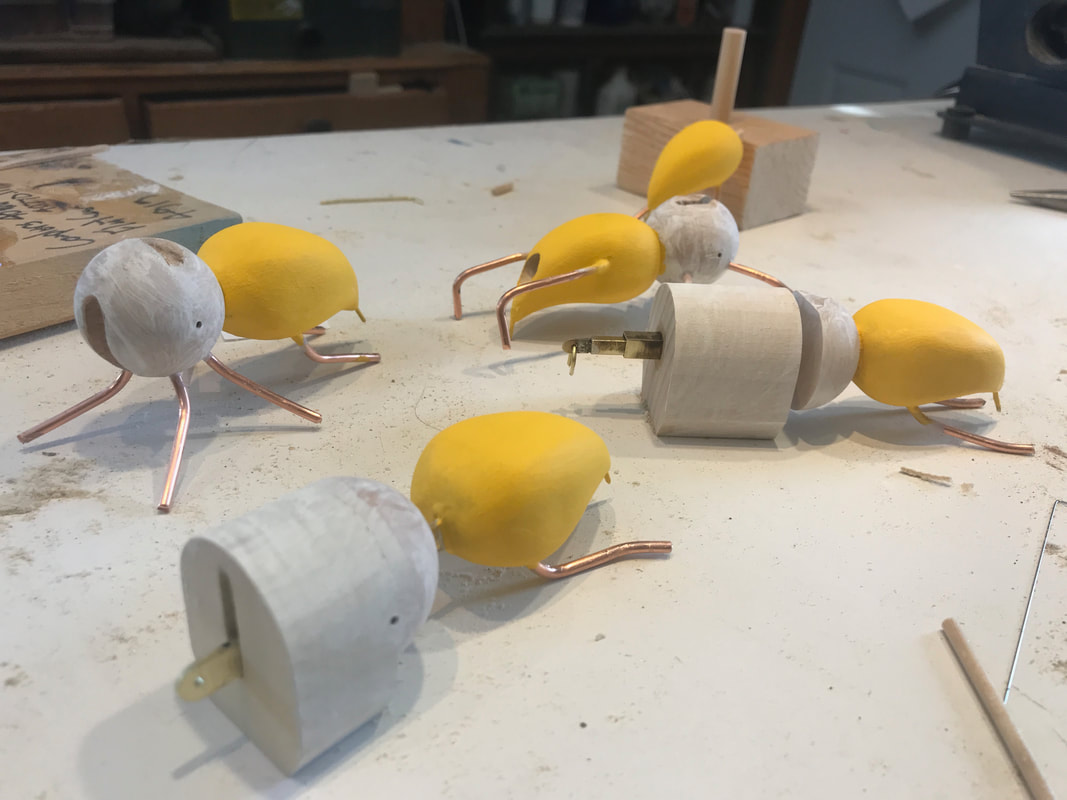
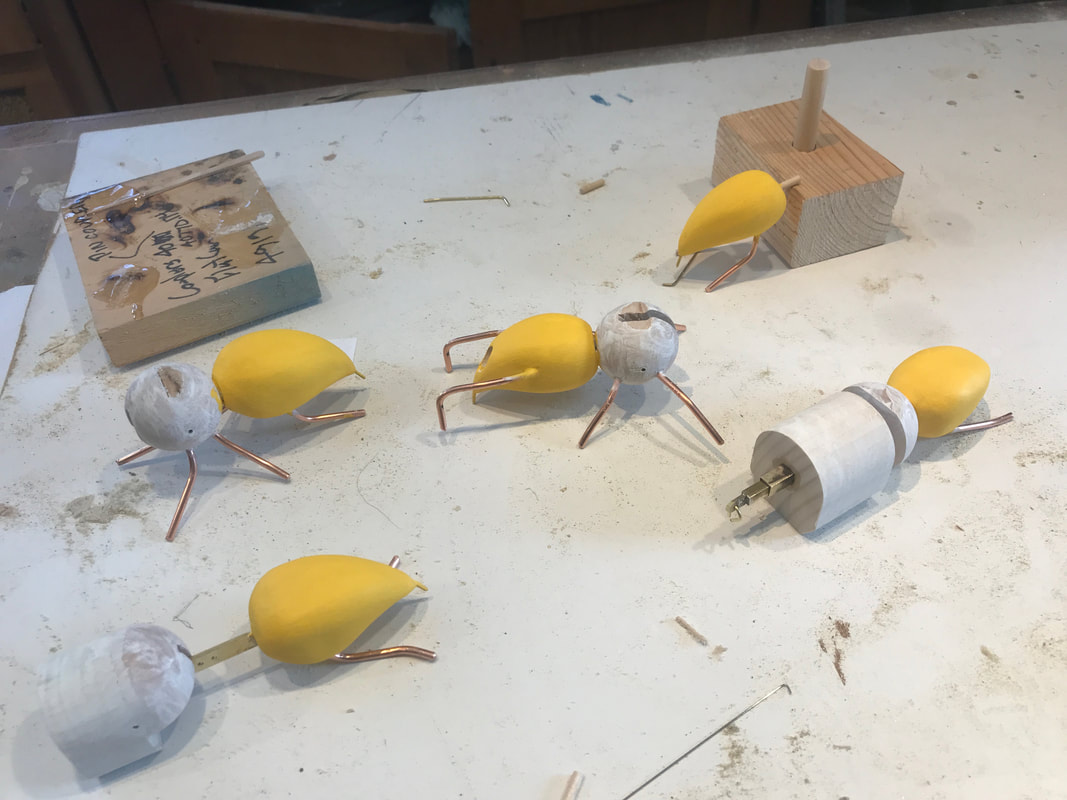
Finally I mounted the comb on a temporary base to stabilize it while I continued to work. Some more paint and and little brighter overspray to provide some shadow for depth and it ready for bee mounting and mechanism linkages. Thats the next blog.! 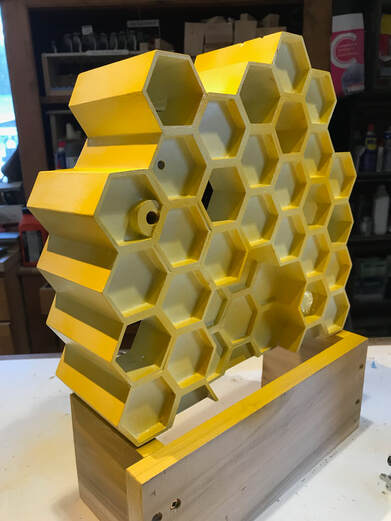 Well the bees are basically complete. The bees are made of several pieces depending on their movements. Many are partially hidden in the honeycomb so they are not a complete bee. in these cases the movement actuator protrudes out of the rear of the bee to link to the mechanism. The abdomens, when present, are made from a basswood block that tapers to a stinger in the back end. Some examples, already painted with a base coat of yellow, are shown in the two photos below. The centre piece of bee bodies are made from 1-1/4" wooden balls, purchased as project parts from a local tool store. You can see two complete ones painted white below. They are stuck together with the abdomen using a 1/8" dowel for strength. A small flat was sanded on each piece for an additional gluing surface. In some other cases the bees have only half an abdomen. This was done by cutting on of the 1-1/4" balls in half on my scroll saw. This takes great care as it is a genuine finger cutting risk! I sand the cut face smooth and dowel it into the other end of the abdomen. In these cases the bees are in the honey comb and there is a block shaped to fit the bottom cell profile to secure them in place. The photos show two configurations like this. one in the foreground of the photo on the left has a slot cut through it with an rocker arm that pivots of a pin. This bee when completed will bounce it's butt and down. The other, a little to the right of the other slides in and out of the block. As mentioned previously the legs are made from copper wire inserted in holes drilled in the abdomen and thorax and secured with CA glue.
rods attached as antennae. Those that don't move are attached to the thorax with a dowel. Those that move have specific connections to allow for their movements, either up and down, side to side or spinning. Here are some examples in the photos below.
 A wing Flapping Bee! Where the heads In these photos you'll notice it is hard to see the bees eyes. I decided I go for a more natural, realistic look rather than cartoon coloured white eyes with black pupils, although they can be made more expressive. For now I am staying with a natural look, but that could change!
Well that's all for now, more on the bees and comb later! I have registered for AutomataCon 2022 in Morristown New Jersey, on May 20 to 22!
Hopefully enough folks will come out of hiding from the pandemic to make it to the show this year.I have been invited to participate in a panel again this year, the subject of which is yet to be determined. I look forward to seeing old acquaintances and meeting new folks! See you there. Okay, okay, with COVID waning for now I am returning to some semblance of normality, which means building and blogging automata projects again after some absence. The current project incorporates some bees, 11 of them to be exact. They are each about 4" long in size, but some are only partial bodies as they will be embedded in a comb. In the photo below you can see six bees under construction. They are made of basswood rather than tupelo which I often use because I wanted a little more strength to give strength to the leg joints. The legs are made from 12 gauge copper wire. I wanted them to be bendable to configure to their placement on the comb. The thought of making more fragile wooden legs seemed more than my fat fingers and patience could handle, so I convinced myself of that I would apply the three foot rule and forego small detail on the legs. Similarly the antennae are made of brass rods brass to escape the wrath of little fingers. All of the bees move of course; after all it is automata! The heads seen here either bob up and down, move side-to-side, or spin. The large abdomen on the right slides in and out of a comb cell. there will even bee wing flapping, yes you heard it here first! A prototype single cell structure is shown with the abdomen stuffed in it. More on the comb in a future blog. So this is the start of things. I have a plan, believe it or not, and have some more photos and video to share later. In the meantime it is back to the bees... 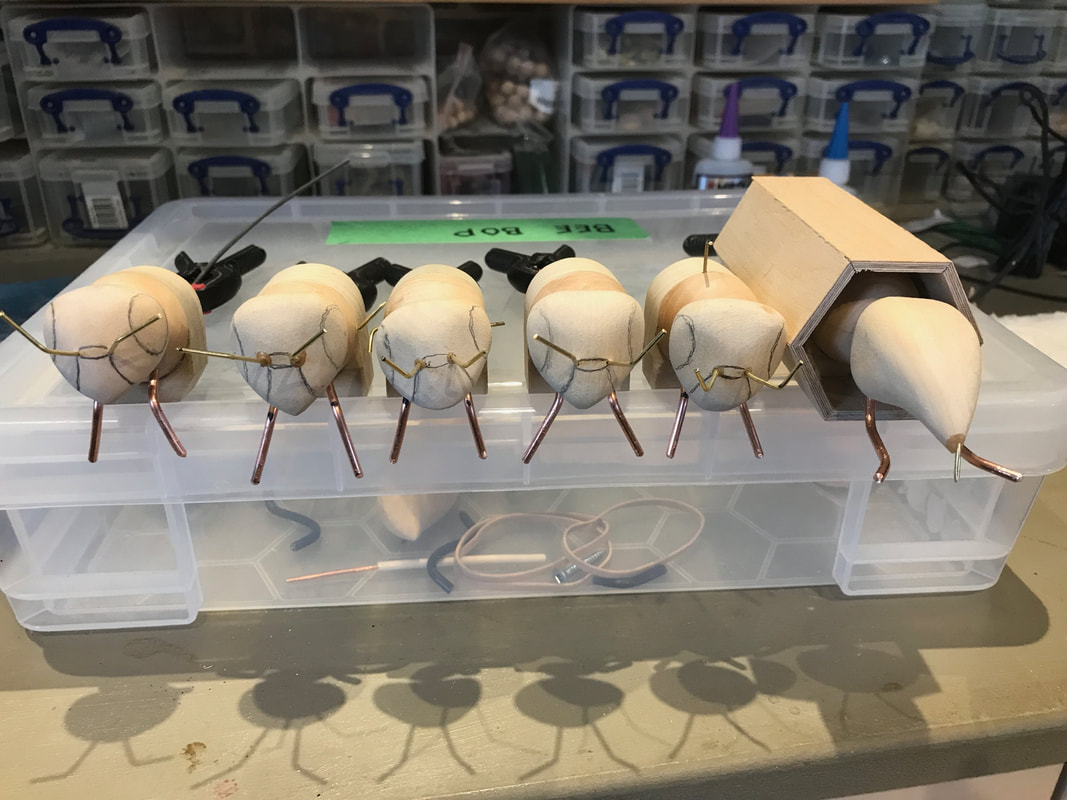 Bees Bee'in Built! Check out the stinger. I just posted my latest automata project on my website, "Swimming With the Dolphins". Here is a quick picture, but follow this link to the webpage! click here 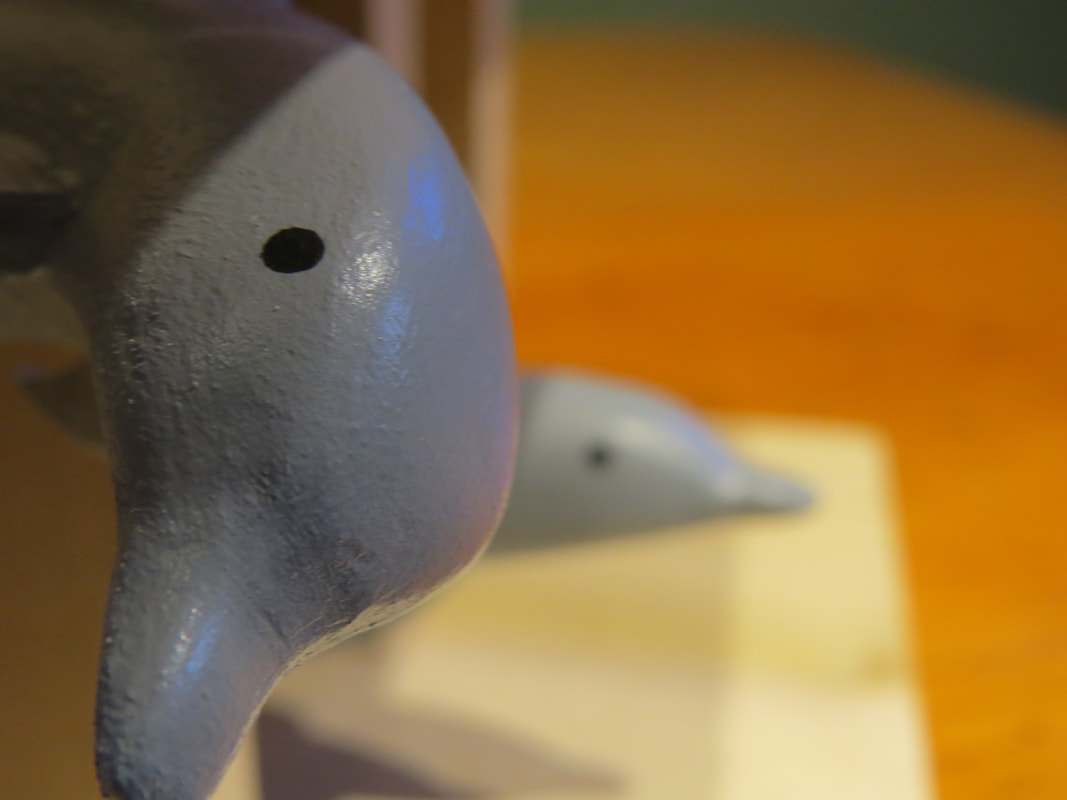 It is always a proud moment for a teacher when one of their students does excellent work under their guidance. I want to share with you one such student who took on a project from the Conquergood Creative Learning Centre. Joaquin Clavell of Switzerland purchased the templates and video instruction guides to make "Waiting at the Clinic", an automata depicting several patients waiting to get medical treatment at a clinic under the watchful eye of the triage nurse. Joaquin is nearing completion of the project and has sent me several photos of his progress. He is one of several students who have taken on this project. His work seems excellently executed and he has instituted at least one innovation of his own along the way. He has given me permission to post his project photos on the blog so that I may show them to others to inspire them to take the plunge in to automata building! Thanks very much Joaquin, and excellent work! Al  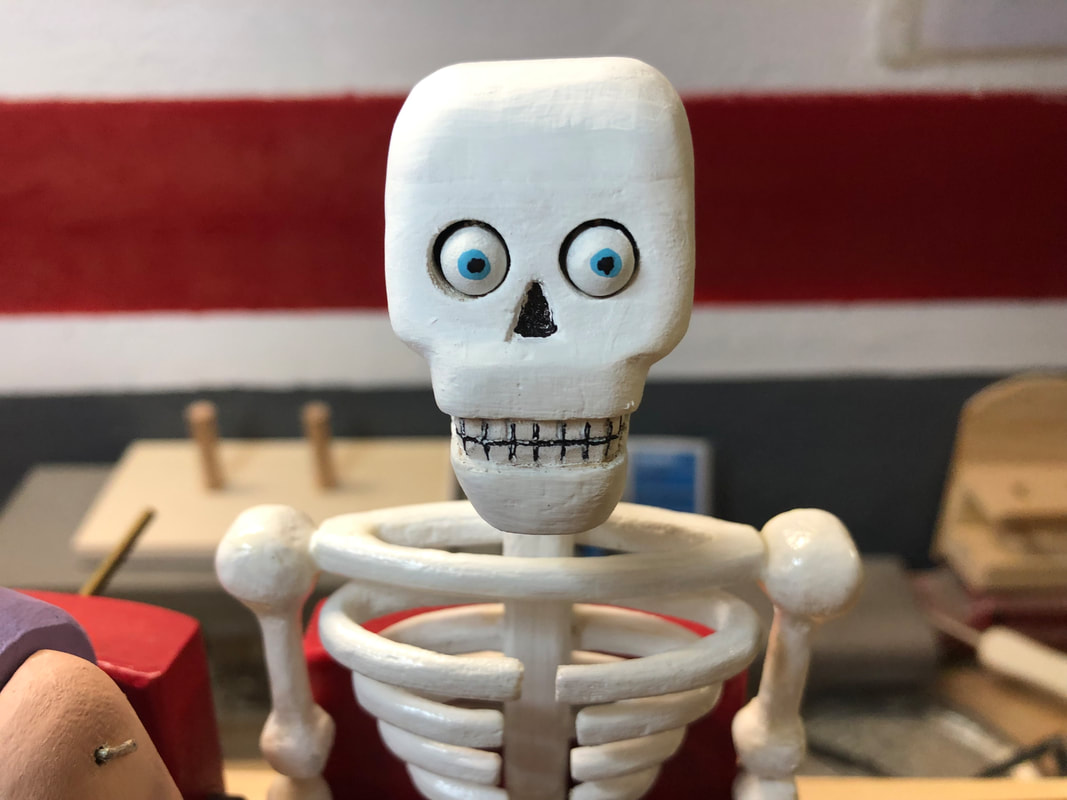  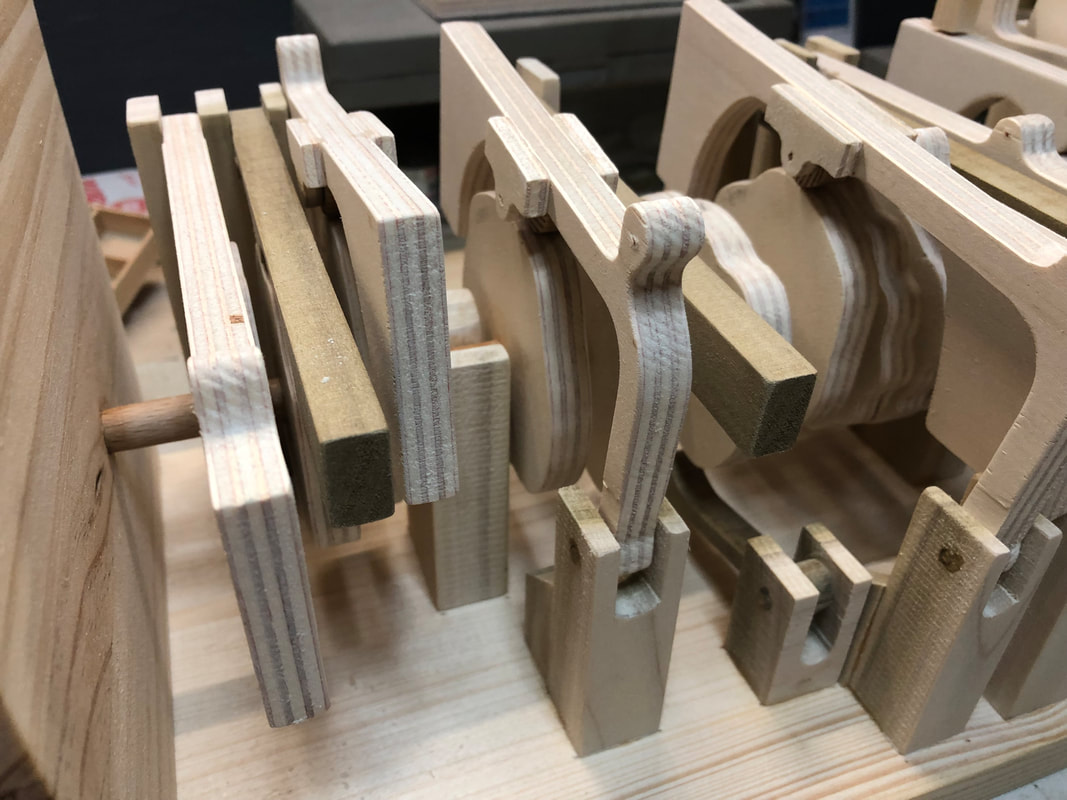   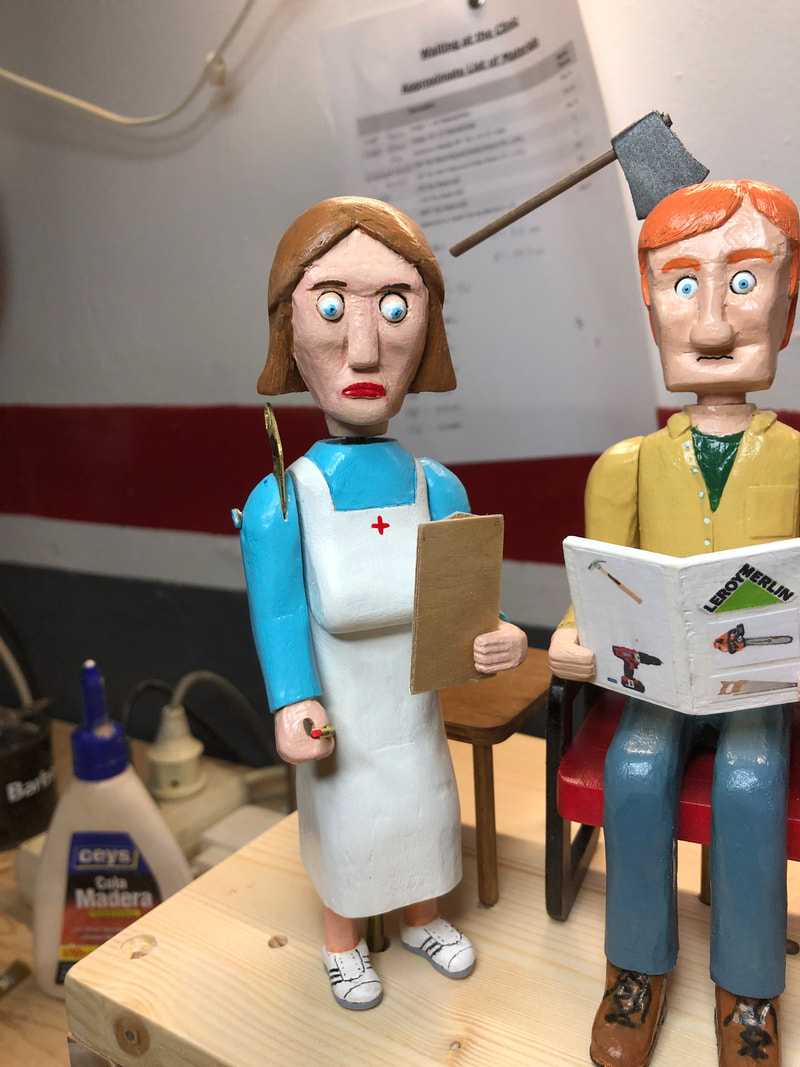 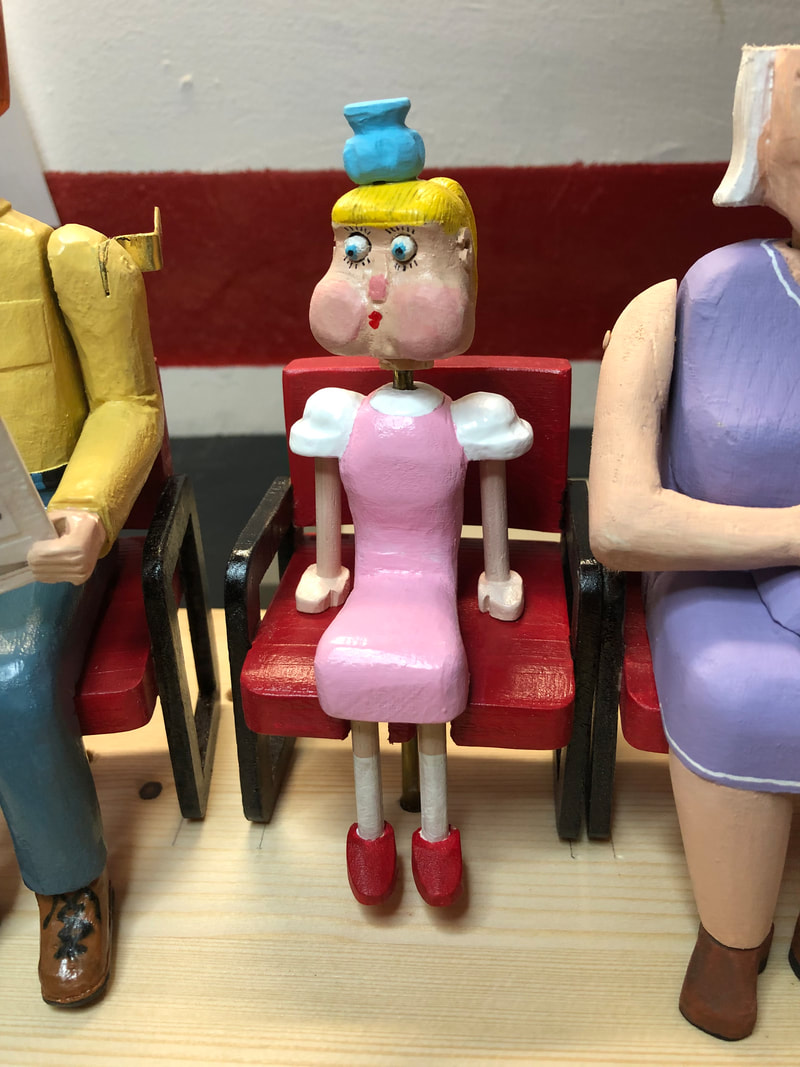 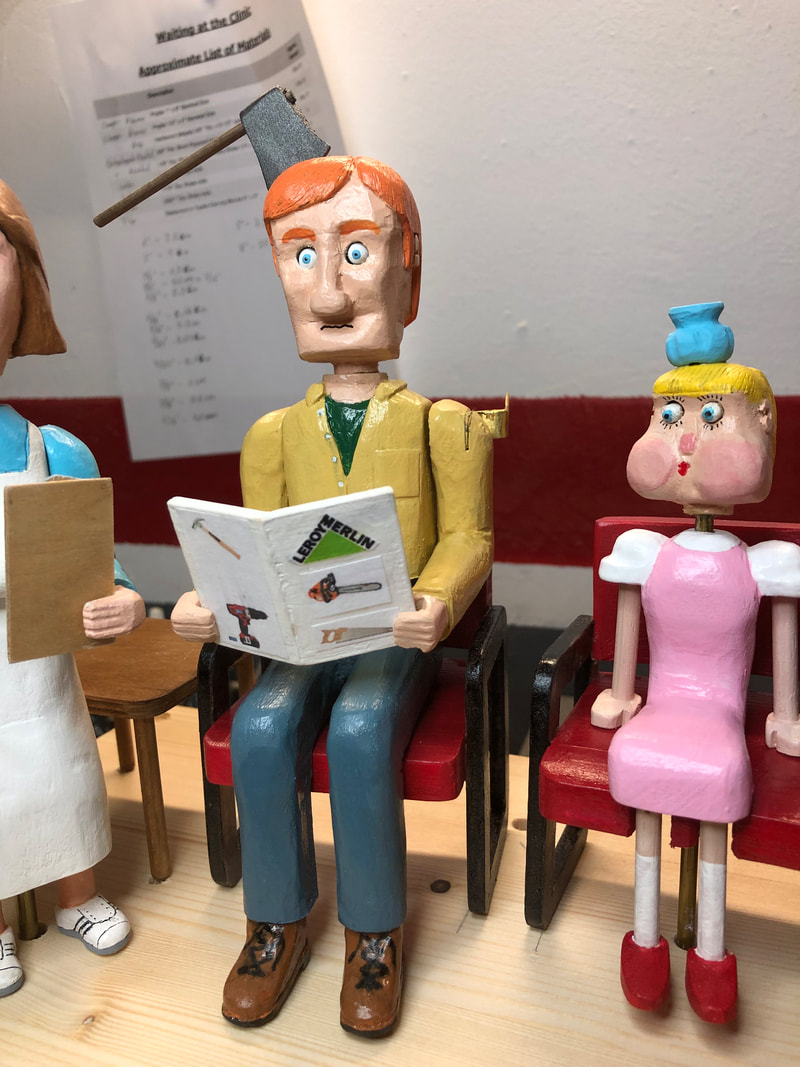    I've been a Garden Railroader for several years now. It all started with H0 Scale layouts my father maintained and I ultimately inherited. As a young man raising a family and living in smaller spaces, I switched to N Scale to get more train in a small space, but of course my fingers got too fat and my eyes to dim! What a perfect excuse to move up to G scale. Bigger toys for big boys! I loved the design, construction and operation of this outdoor adventure, watching trains wind through a garden with large running ponds, and large buildings. Adding the dimensions of computer control for multi train operations and live sound it created a wondrous world to escape into. I would spend time in the garden, coffee in hand, watching trains appear and disappear through the foliage. I loved it! What happened? A little more time passes and the act of bending to weed, and attend to trains became the issue. I would move around the layout, cushion in hand, on hands and knees ballasting, clearing switch forks, pulling weeds, removing sticks and leaves and tending plants in the garden. This work was taking the fun of the hobby. I guess I should have elevated the track! At the same time I was spending more and more time making automata, and the garden maintenance was not being done regularly enough. It was time to move on, or my layout and equipment would simply sit until someone other than I would be responsible to find someone to pass the equipment to. So with sadness I dismantled the layout, and collected up the equipment and look to pass the torch to another garden railroad enthusiast. It was a great ride! 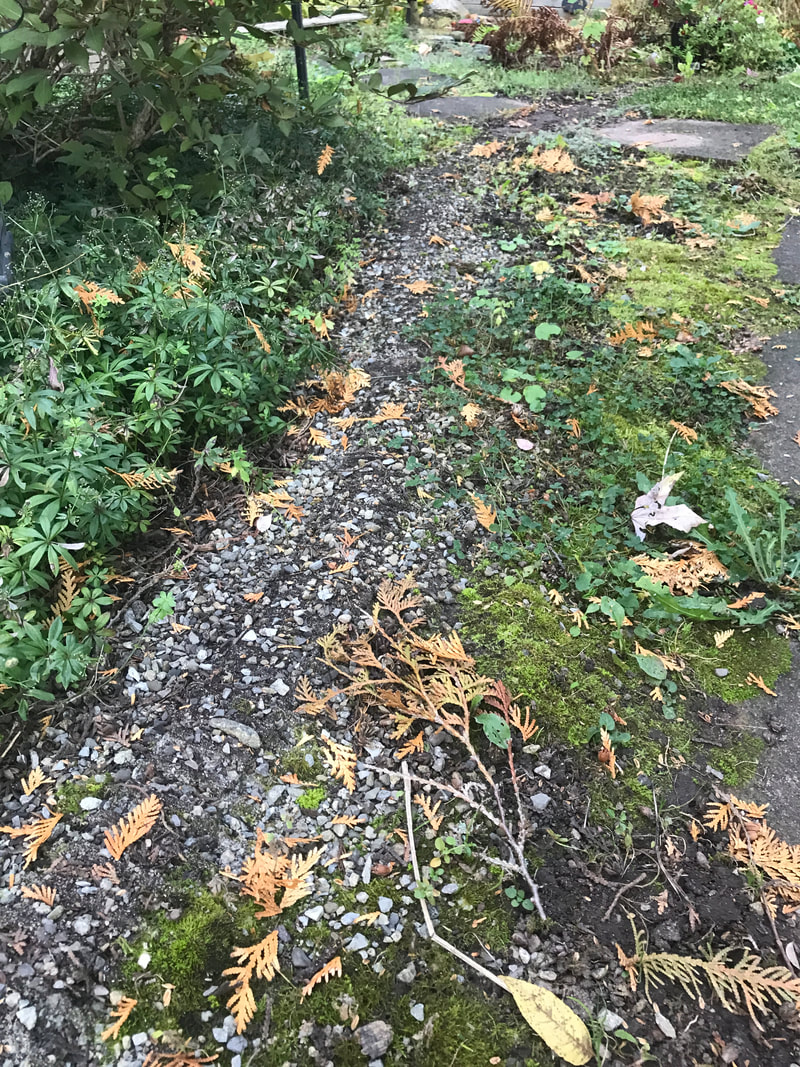 Only the roadbed remains of the South Bay Railway. Oct 2021. Here is a teaser video of my latest completed automata project of a skeleton tubing on the River Styx to kill time while waiting in the the underworld of Greek mythology. Full video and back story coming soon on a new webpage!
|
Why Automata?Automata is a creative blend of my life interests , engineering, art and woodworking. Archives
July 2022
Categories
All
|

 RSS Feed