|
As I sat in front of the TV painting an automata chair I got an email last evening that said water was pouring out from under my garage door in Toronto, almost two hours away. Forty minutes later I expedited someone to enter our house and shut off the water and jumped in the car to drive home. I thought to myself this will cut into my shop time for sure!
Ruined Laminate flooring, wet carpets, sagging drywall ceilings - what could be more fun! All over a SS braided hose on the kitchen sink tap that split after more than twenty five years of service while no one was home. So I'll be doing computer work at home this week while the house dries out and dehumidifies. It wasn't part of the plan. These are lifes little moments!
1 Comment
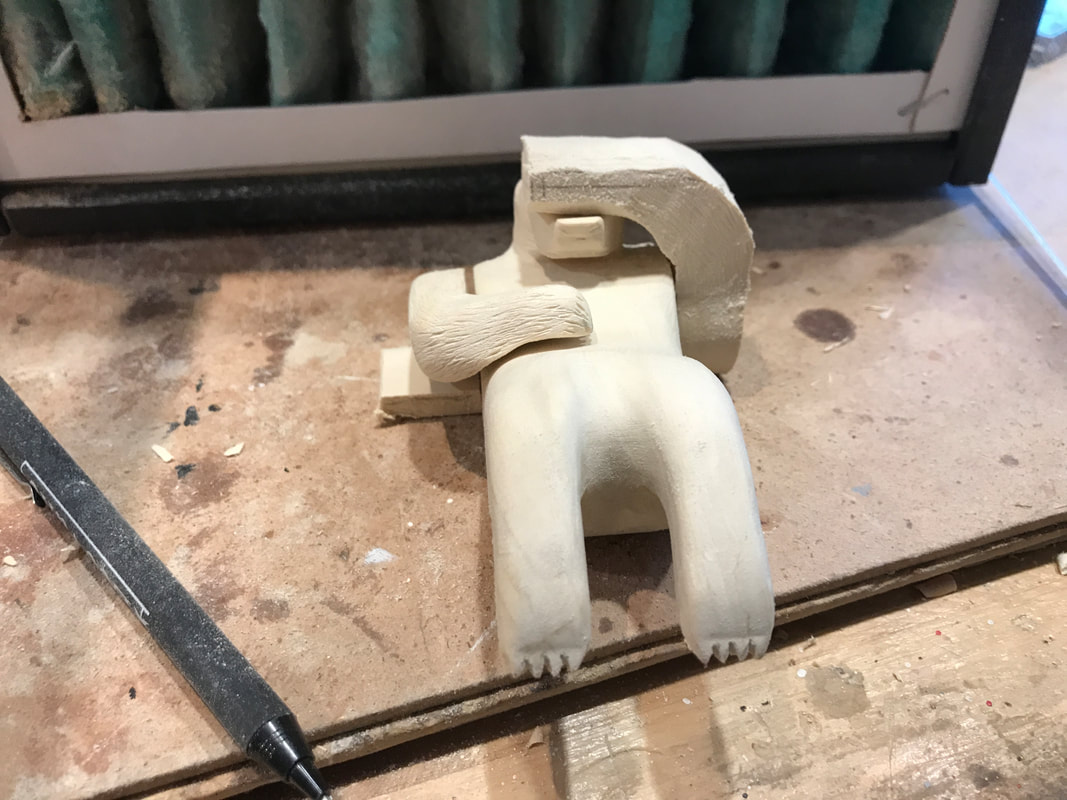
The bear named Misery in "The Bipolar Brain" suffers from depression. It an attempt to visually impart that in an automata scene I had to find a posture, or a look, that suggested depression. It was a bit of a challenge to say the least for something you can't see. My depiction would be one of withdrawal. Misery has lifted her feet from the control pedals, removed her hands from the joysticks, and drawn her legs up into a partial fetal position. She lays her right arm on her stomach in a lethargic way and drapes her left arm over her head to hide closed eyes from the light. I decided the arms should be made separately rather than shaped as part of the body block. It would allow me to impart more detail on the head under the arm and finish it similar to her partners head. Automata characters are allowed to be cartoonish so any "detached" appearance is acceptable me here. The challenge is shaping the arm starting from the flats left on the shoulders of the body, to where you want the hands to be positioned. You can sketch this all you want but for me the reality is starting with a rough oversized shape with the matching shoulder flat and cutting it down between multiple test fittings. The photos below show the bear's right arm completed and the starting shape of the the left arm. We will follow the fabrication of the left arm in this blog. You can see the arm block as it was started on the left photo. The flat for the shoulder has been sanded. The block is thick at the hand end to allow me to make adjustments as I go. On the right you can see some shaping completed. I am trying to maintain clearance under the arm to allow the hand to sit flat on the face as I go. The bottom of the hand is shaped to match the profile of the top of the head. As I work I remove material from the bottom of the arm. When satisfied I remove material from the back of the shoulder to match the bear's back.
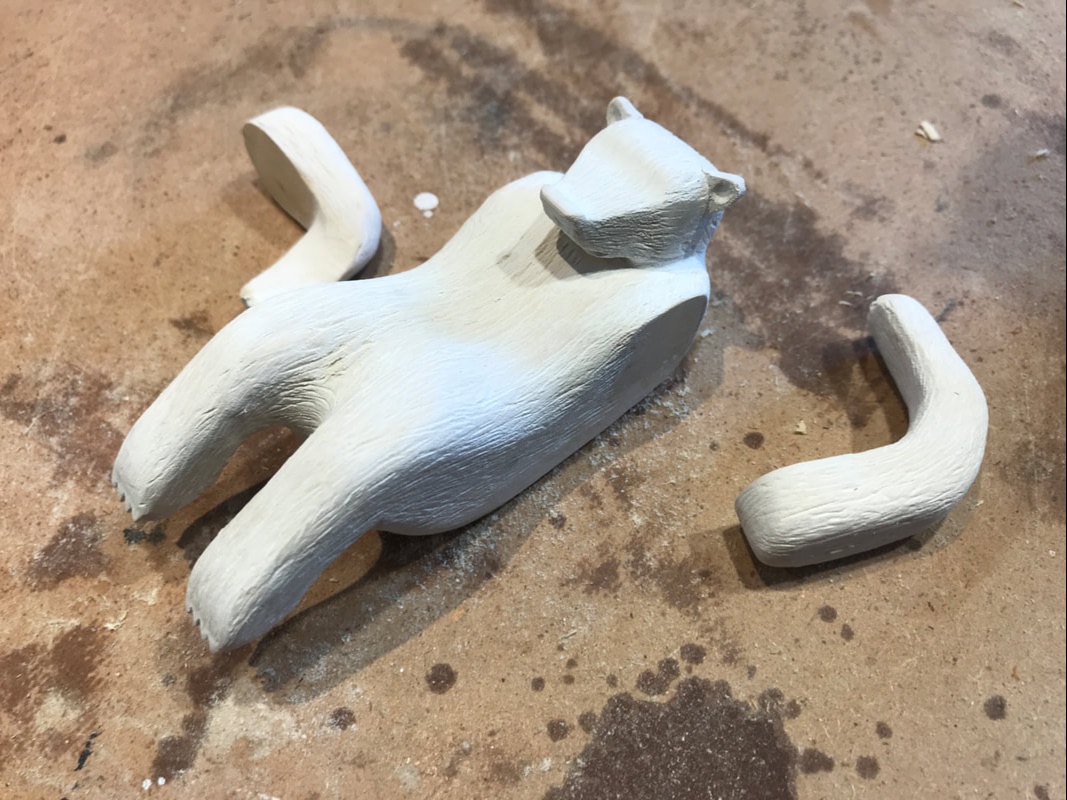
After more shaping, sanding, and cutting fur into the arm, on the left below you can see both arms and the body block coated in a white sand-able sealer. On the left is is a photo with the pieces lying in their final position after a first coat of white paint. At this point you have to start painting the details on the head that will be hidden under the left arm. Once assembled this area will be inaccessible to paint easily.
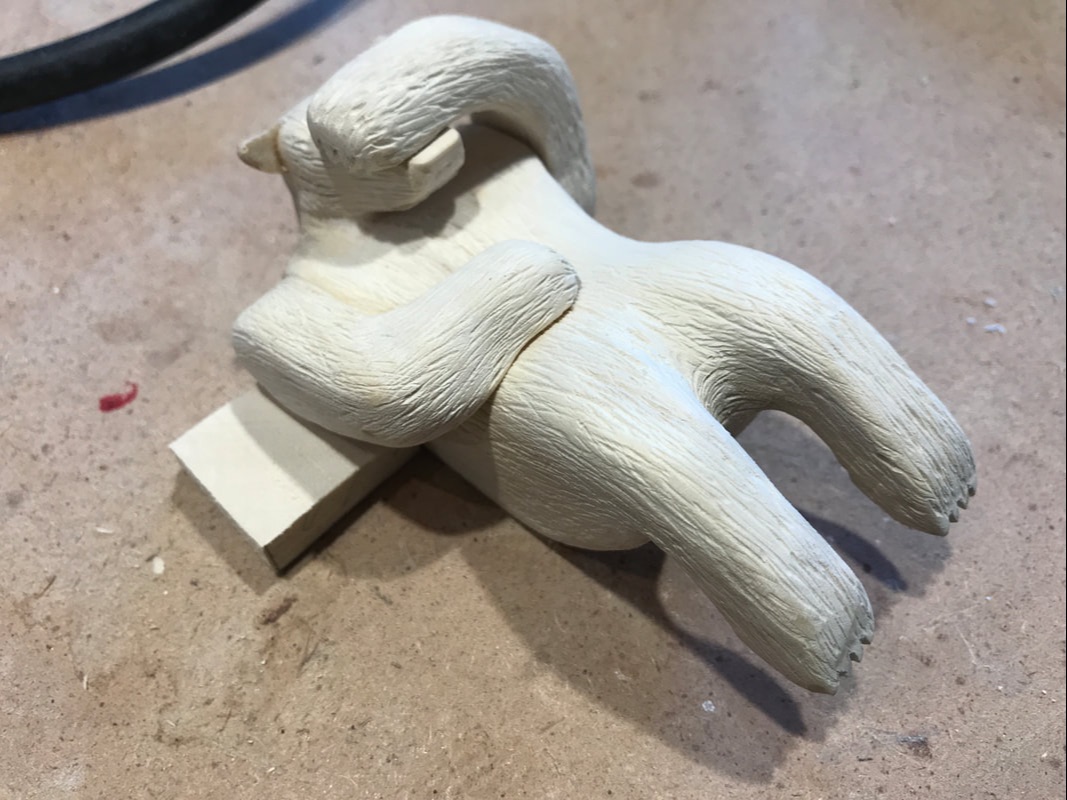
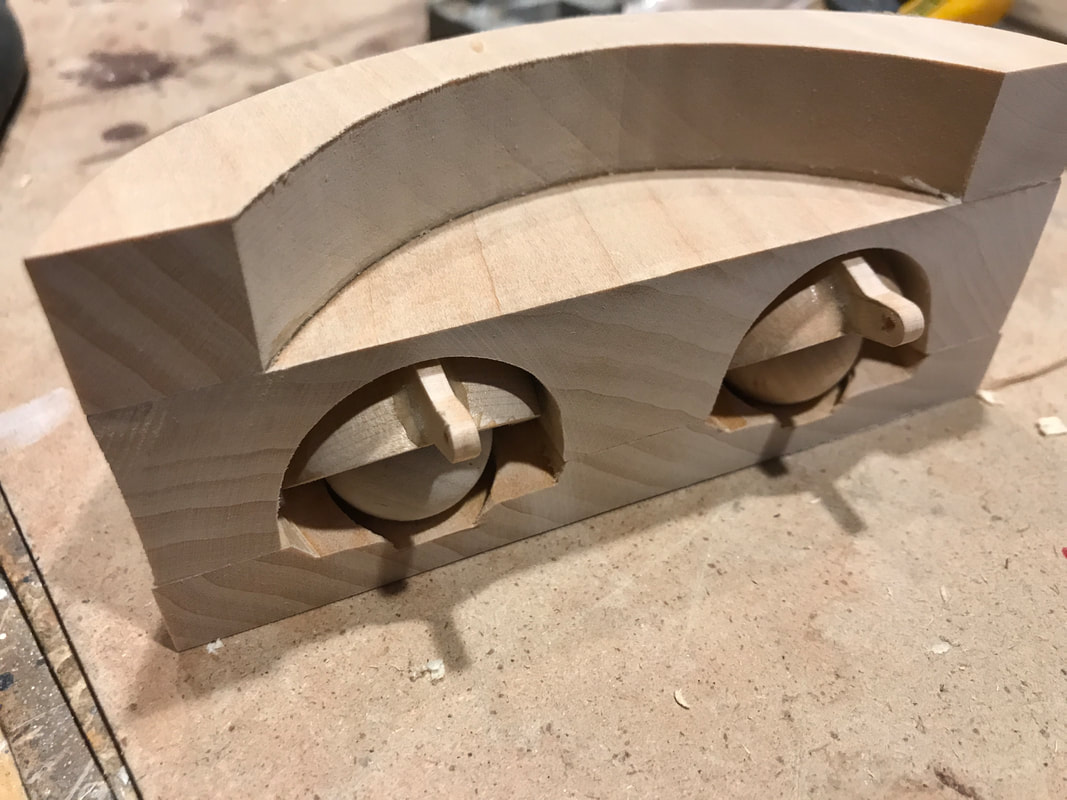
So here is Misery assembled, sitting in one of the early prototype chairs. Hopefully she suggests depression to you.  Back in the shop and I finished the eye setup as intended. Two photos for you, one shows the the back, flush sanding completed and you may notice a little relief on the lower block that lets the eyelids open just a little bit further. The eyeballs are in. The other photo is a front view. This chunk is done now until top works assembly so it is going to bed for a while.
The other chore for today was to checkout if I could make the head opening action work as I had imagined. The photo below shows a prototype mockup using two scraps of pine. I decided to use SOSS hinges as they are completely hidden when closed and very compact. They can be a little stiff to operate so I wanted to try them out. The upper piece represents one half of the top of the part of the head that opens. I figured it would be about the same weight as the piece of basswood I would use when it is all hollowed out. In the front right you can see what will be the operating cable. This one is actually a heavy aileron control cable used by model airplane builders made by DU-BRO. To work effectively it relies on being constrained in a tube so that the cable will not bend when being used in the push position. You cannot see the cable as it is embedded in the blocks on the front. The cable end shown is not contained, as it needs to bend to follow the attachment link as the head piece opens. The more of the cable that is in a sheath, the better it will operate, so this will need to be carried down into the actuation point in the mechanism. For straight sections, adding solder to make it rigid also helps. Anyway, it is a little stiff, but workable. I'll see if there is something I can do to lessen up the hinge. 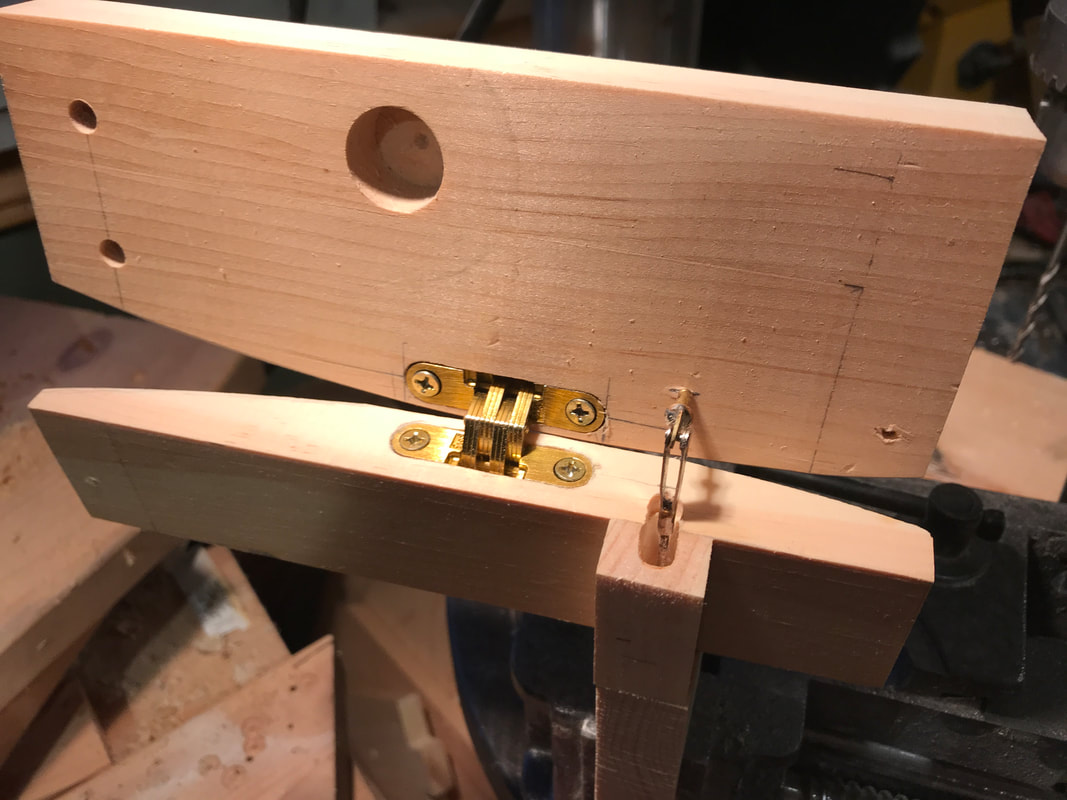 Along with a few other distracting tasks today, I got back into the shop and worked on the eyblock sculpting. Things have progressed along. I added a thicker base block as I mentioned in the last blog. It is still not permentantly attached and will not be until the eyeballs and eyelids are painted and installed. For the shaping I put a small screw and a couple of pins to hold the pieces together. The line at the nose is not blended and sanded smooth yet and it will also have to wait until things are being assembled.
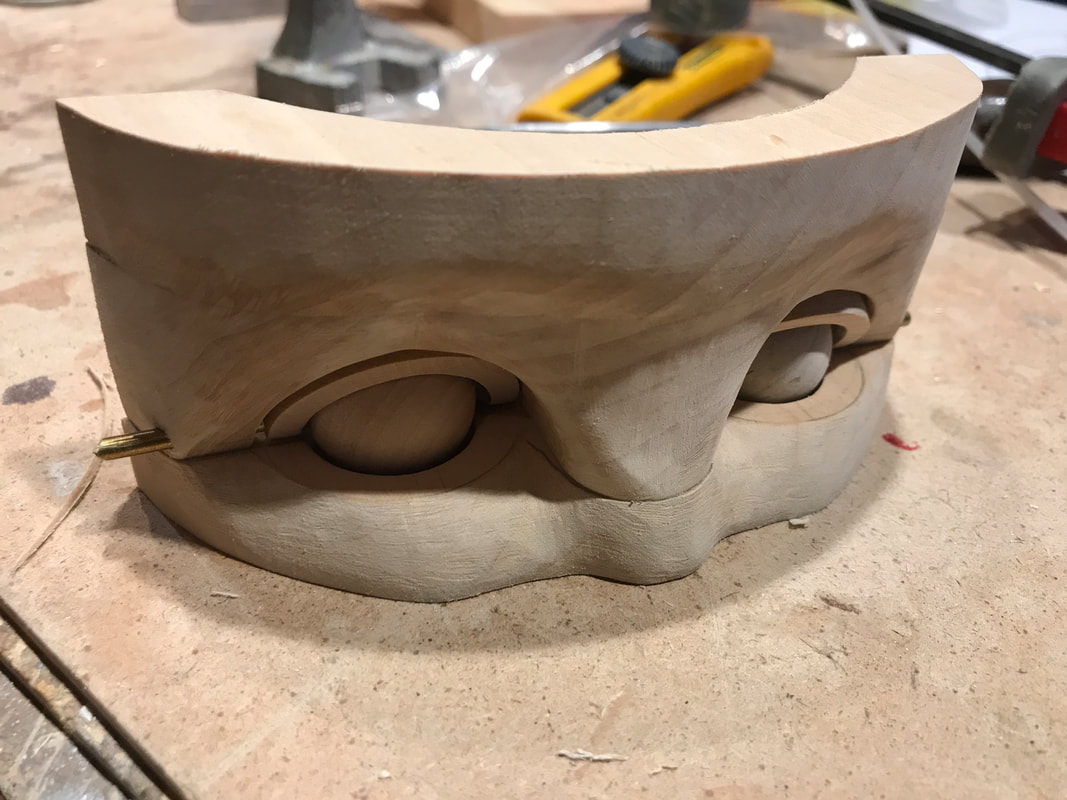
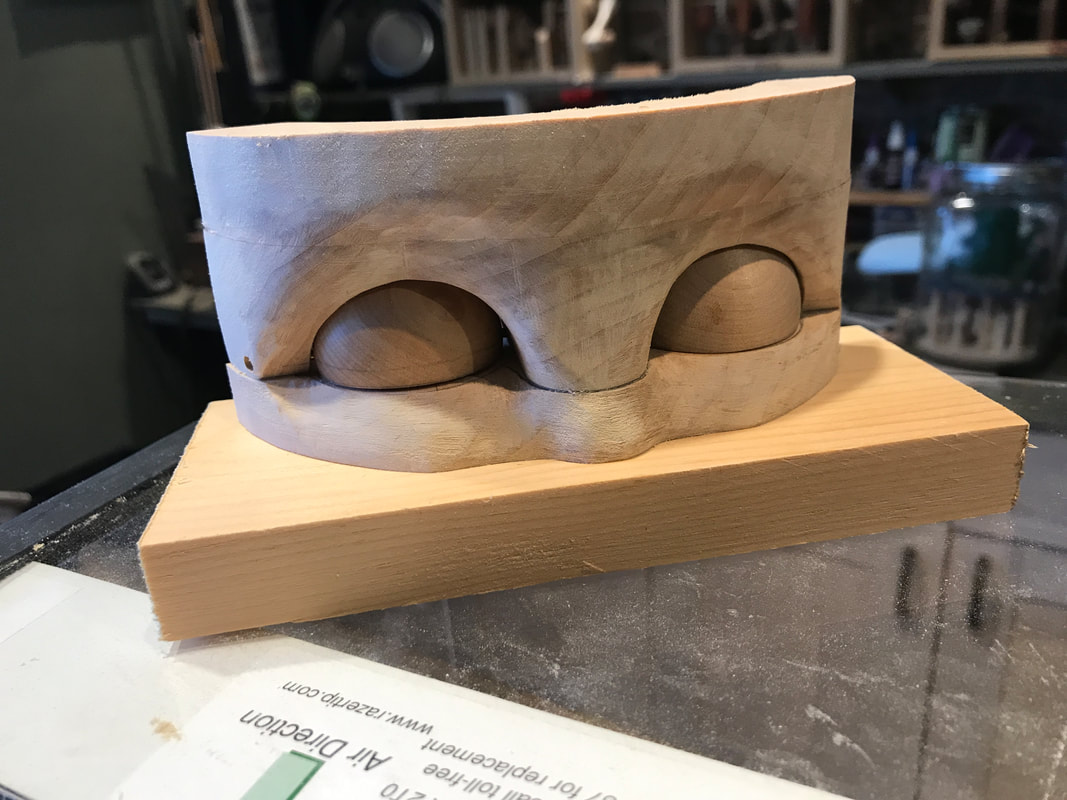
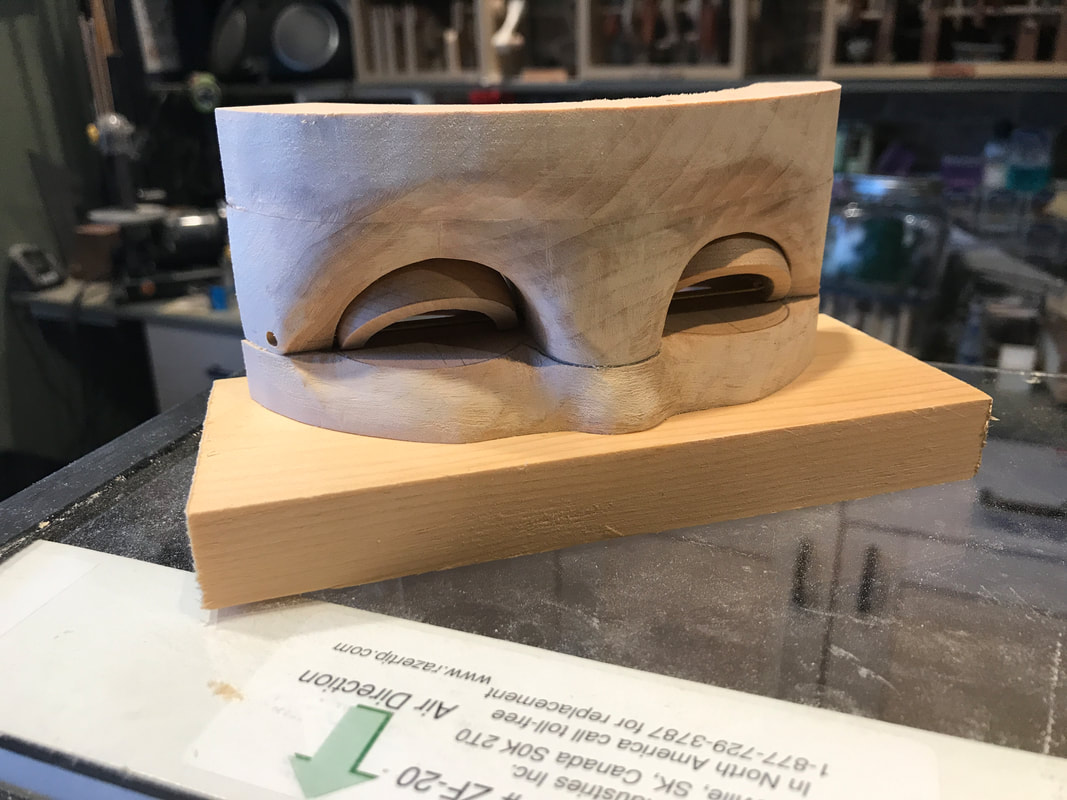
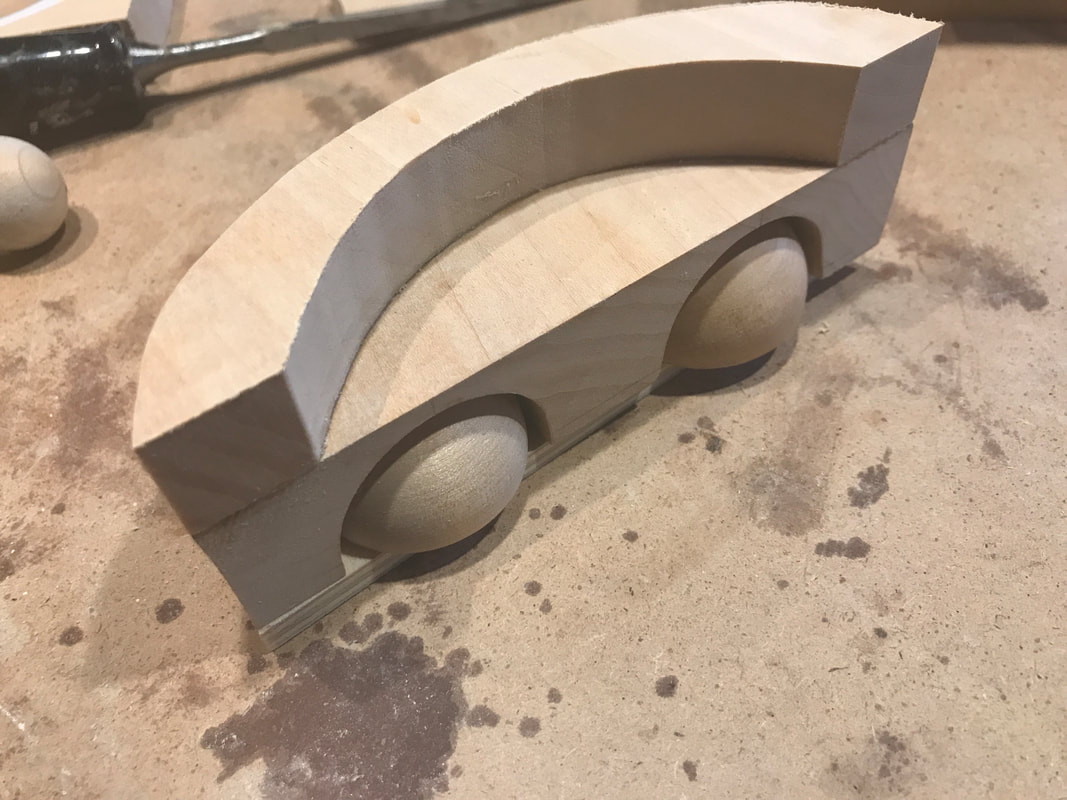
Yesterday I promised a photo of the lever arms on the back of the eyelids. Here it is! you can see that I will need to sand the back surface so all the pieces are flush when glued to the rest of the head. This is another assembly critical tasks as this has to be done before the eyelids are permanently installed. I will do this and set the eyes to the right depth tomorrow and then set things aside while I work on another part of the project. Might be the head ring or doing a test setup of the hinges. I will see how the spirit moves me. 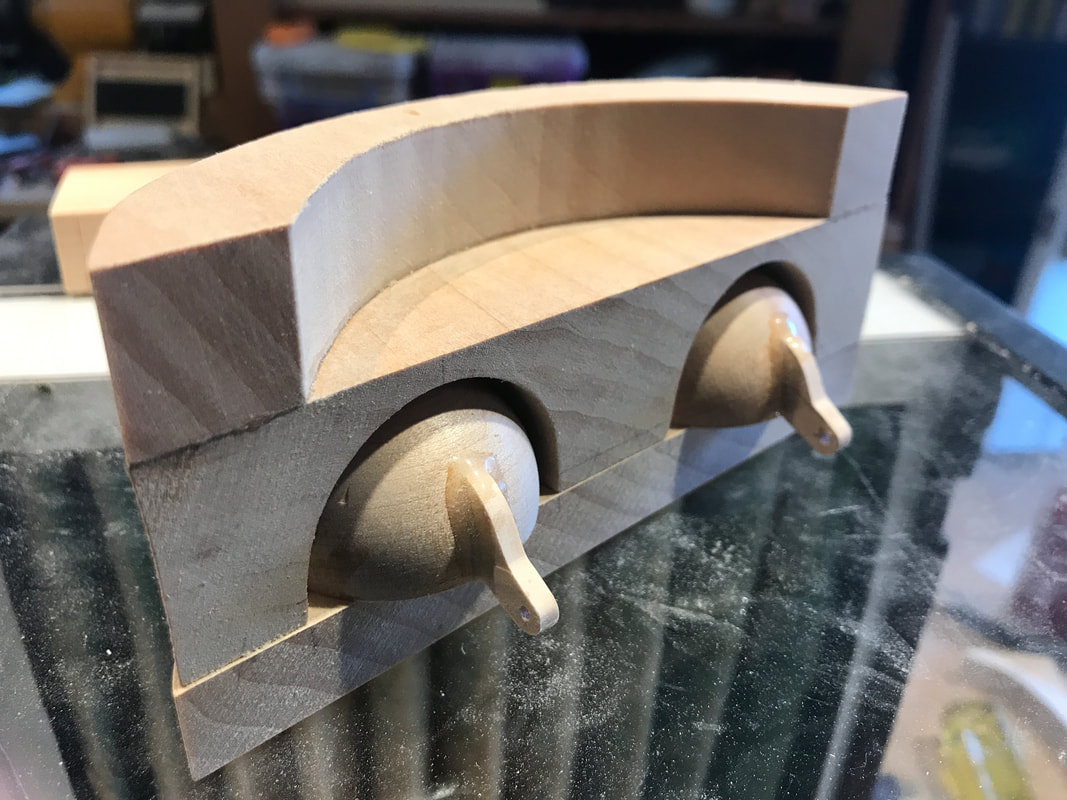 Yes it is a terrible pun, but today's fun was creating the brow and features around the eyes of the head of the Bipolar Brain. A few days ago I posted the eyes and eyelids I had made but now it was time to work out the surrounding structure. Making eyes in this manor requires some subassembly along the way that once completed is difficult to undo. So let's see what I have been up to. The first photo shows the two eyeballs sitting in the lower section of the brow assembly. Remember they have 1/8" brass rods that go into the bottom of the eyeballs that will activate a rotational movement. The 3/4" piece of stock is just meant to simulate the final top plate of the automata. The height of the eyeballs when installed is a key dimension. Installed too high they will rub on the inside of the eyelids and bind. The choice to come is either sand a small flat on the bottom to lower them or countersink a depression in the top plate. The piece of plywood will eventually be replaced with basswood but until I'm happy with the fit up I will use this piece of plywood. The large holes hide the lower part of the eyeballs from view and serve to help contain them in place. The prime locating feature is the hole for the 1/8" rod, of course. I try to build these eye structures fairly loose. Add some paint and things will get tighter! 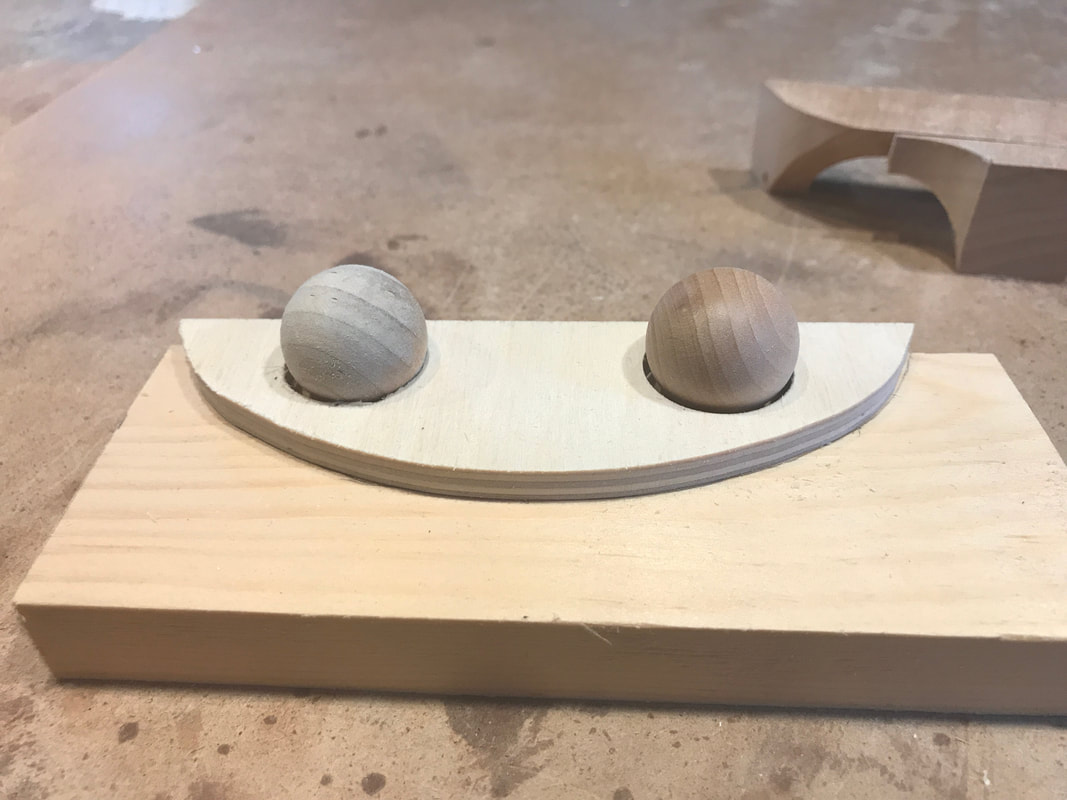 The next picture shows the eyelids sitting in place over the eyeballs. This is the first inkling you get that the eyeballs may need to be lowered. The final placement of the eyelids, determined by the eyelid axel rods, will be slightly higher so the can rotate up and down easily. 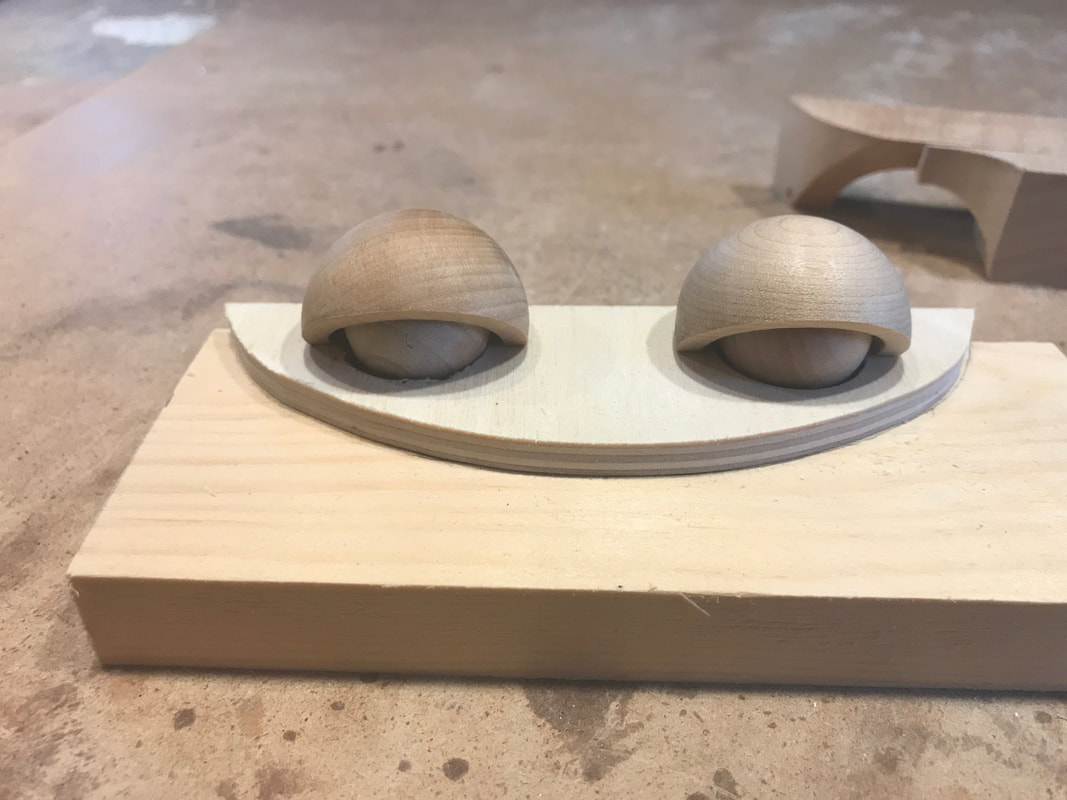 Now the fun, I mean hard work, starts. This is the top block for the eyes. The back has two channels hollowed out to allow the eyelids to be slid in front the rear. This is because the front is angled forward at 15 degrees. This is done so that you cannot see over the top of the eyelids back into the mechanism from the front. This requires a lot of Dremel carving. What you cannot see in the current photo is a long hole that is drilled from right to left that will hold the hinge pins for the eyelids. The hole is drilled as one using a long 1/8" diameter drill after carefully drilling holes of progressively larger diameter from 3/32" diameter upfront either side of the head. There will not be one long axle as the eyes need to pivot, but drilling all the holes at once makes for better alignment. I'll show some more details of this assembly in a later blog. The angled brow makes this fella look more like a frog than a person at this point. 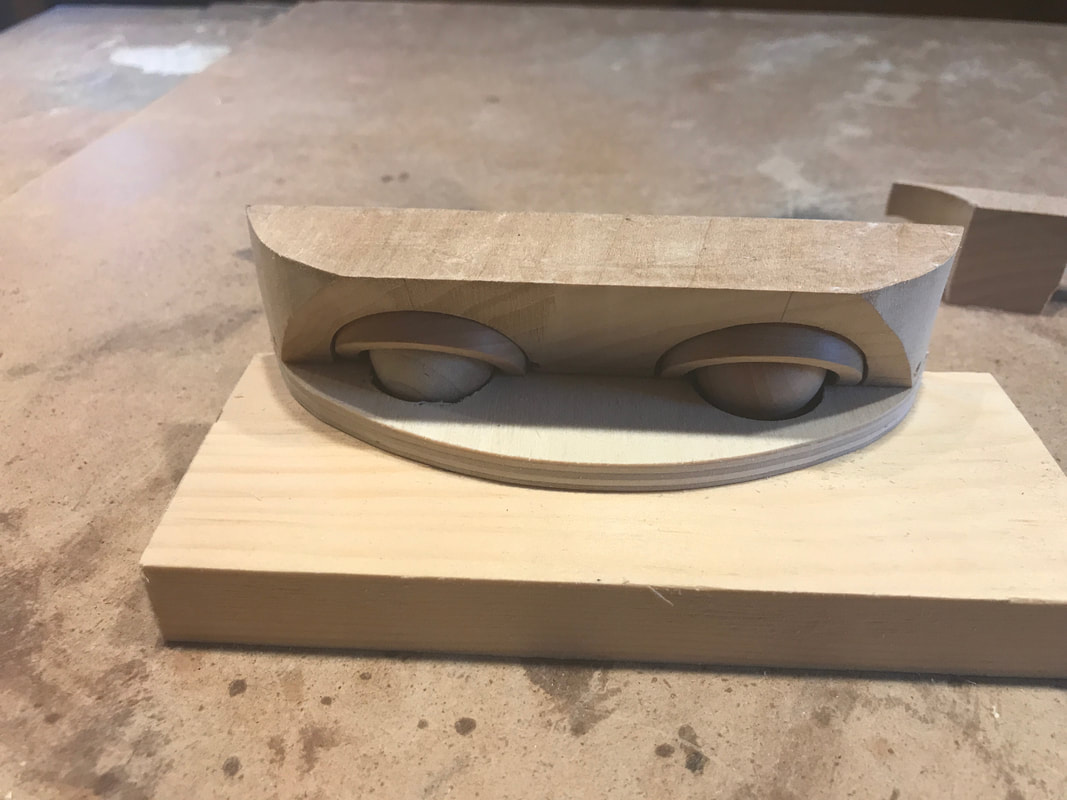 Since I'm not making a frog I will glue back in the matching piece of basswood to allow me to carve the bridge of the nose and brow. I find adding this separate piece later a necessary step . While shaping the inside of the eye chambers on the previous component there is a lot of shaping and fitting done that would be much more difficult with this nose piece in place. 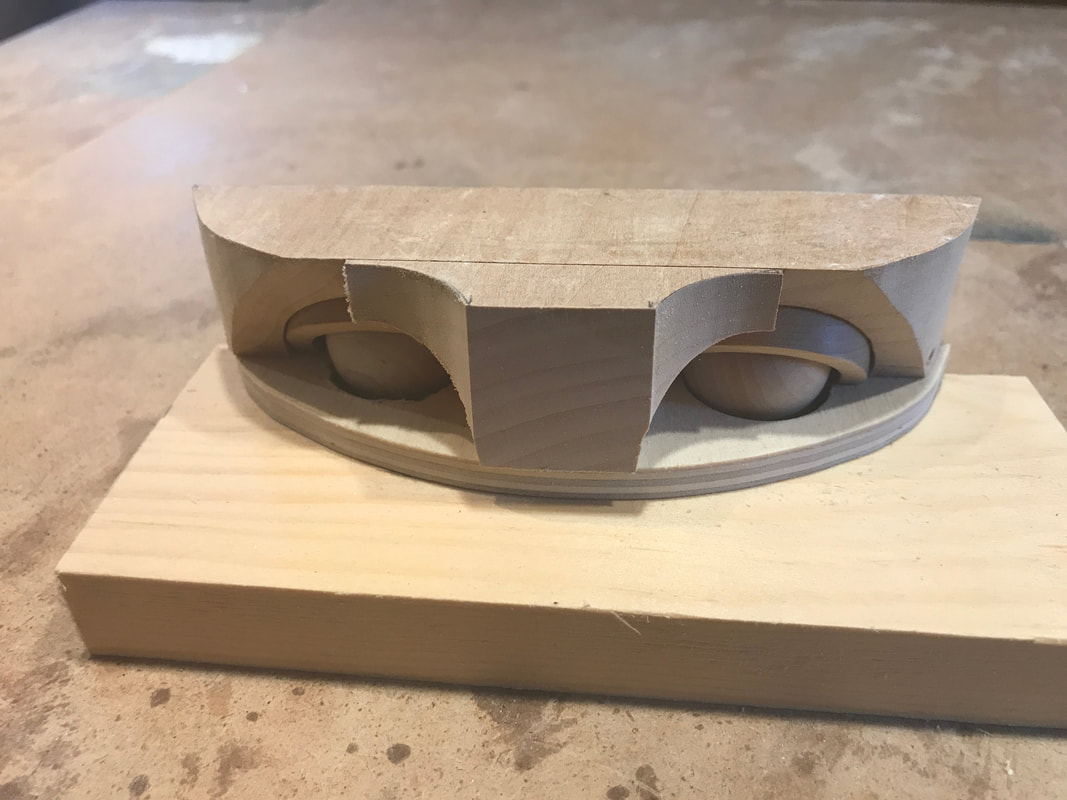 The next photo shows the addition of some stock to the forehead to make up the finished height of this section. It is recessed on the back to allow for other components of the automata to be fitted later. With the clamps on while it dries it looks like some rudimentary Aztec mask! Seeing it a this stage I have decided to increase the thickness of the bass plate to 1/2" from 1/4" for two reasons. More thickness will allow me to fit the eyes without altering the top plate, and also allow more space for the transition under the eyes. I am not trying to make the perfect face here but a saleable one that has movement. Using round components for eyelids has some limitations in creating a true realistic face. This is where you can fall back on a whimsical look rather that an exact one. 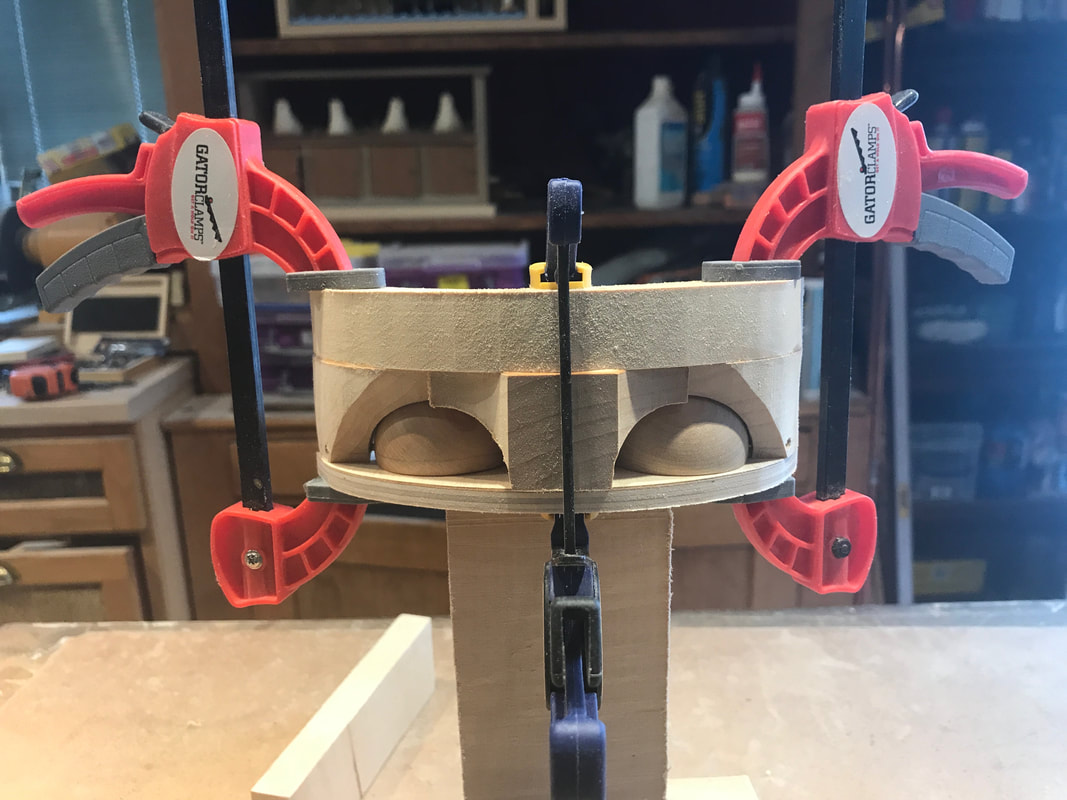 Here's a view from the backside, clamps removed and an angled view from the side. The little space above the eyeballs behind the forehead is the area that will be filled later. What is missing here are two arms that will be attached to the back of the eyelids which will open and close the lids when pushed up and down by the mechanism.
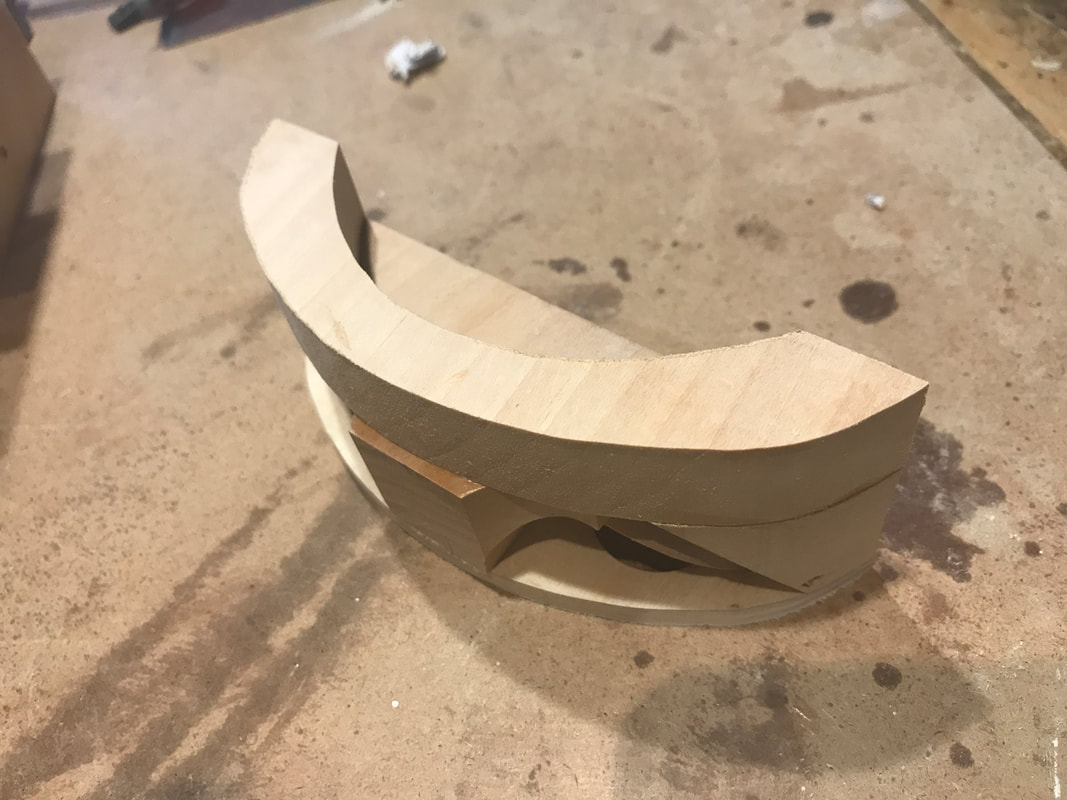
When I started this project I had hoped that I could make to head base in one piece, but wanted the eyes to function nicely so I had to give up on that idea. It will be up to me now to blend the joint where this piece joins the rest of the head nicely.
More to come. I hauled out last years Santa Claus Parade float to check it out this weekend, while it was still warm. I have to decide whether it is going in the parade, or just sitting in town for the day on display, or both. I though by being on display some of the animation elements might be more noticeable than during the night parade. Still deciding. 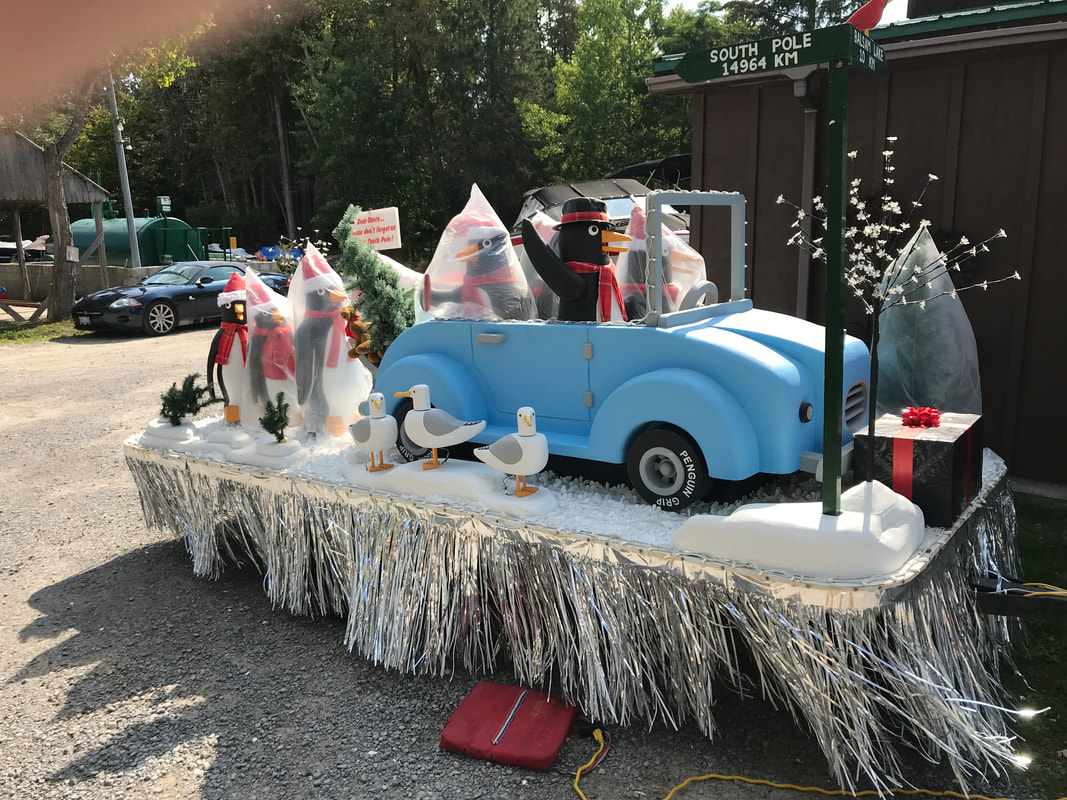 Jumping around a little bison this project. I decided I needed to sort out how the eyes and eyelids of the head on the the Bipolar Brain were going to work before getting to far on the mechanical design. Pictured below are the two eyeballs and eyelids I have made. Making the eyelids is a potential finger ripper. Trying to cut the lemon wedge shaped piece to start the process is tricky. Cutting a 1-1/2" diameter ball on a bandsaw or scroll saw is a way to nip a finger. If you don't have a firm grip on the ball, it can roll, pulling itself into the blade, maybe fingers and all. Even clamping it is no guarantee. I use a different yet slower approach. I sand the ball on my bench sander. Getting a flat stated still requires care, but once started it goes easily enough. These wedges end up at 135 degrees of the original ball. The trick then is to hollow out the inside to allow the eyeball to fit freely. I do this with a burr on my Dremel tool, using a calliper gauge to work to a uniform thickness for the eyelid. I figure a sandpaper burn rather than a cut finger is a better deal, but having made a few of these in the past I came through these unscathed! These bigger eyes are easier than the small ones. You can see the pivot hole in one of the eyelids. 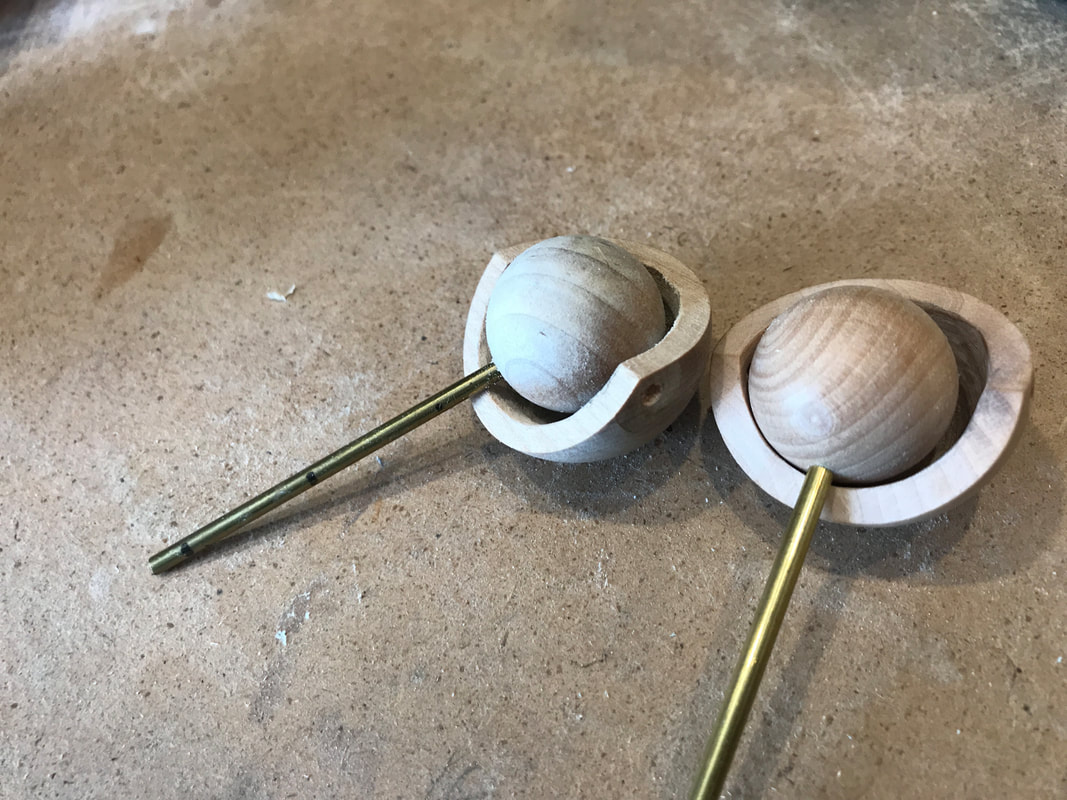 Things have been progressing a bit with on the polar bear front. A carving show, followed by a few days of a beautiful Indian summer have been chewing into my shop time! Winterizing boats, removing buoys and pond pumps from the lake , attending some club meetings and just the laziness that comes with a few really nice days in the fall on the side of a perfectly still lake have slowed me down the last little bit. You have to take time to smell the roses or you'll go crazy! Anyway the joystick flicking, pedal pumping, head twisting polar it about done. He still sits in a prototype chair though. I need to build some linkages into the frame of the chair for the joy sticks and I haven't quite have that decided on the configuration yet. This guys name is going to be Manic. (foreground) Beside him in the photo below is his companion Misery, who seems to have opted out of life for the moment. No joy stick movement, feet off the pedals, and a head buried under her hand seems to be her evolving posture. Of course she has no arms yet and her shape is still developing, but you may get the idea. Some say that opposites attract. It seems to be true in this case. Obviously more to come. 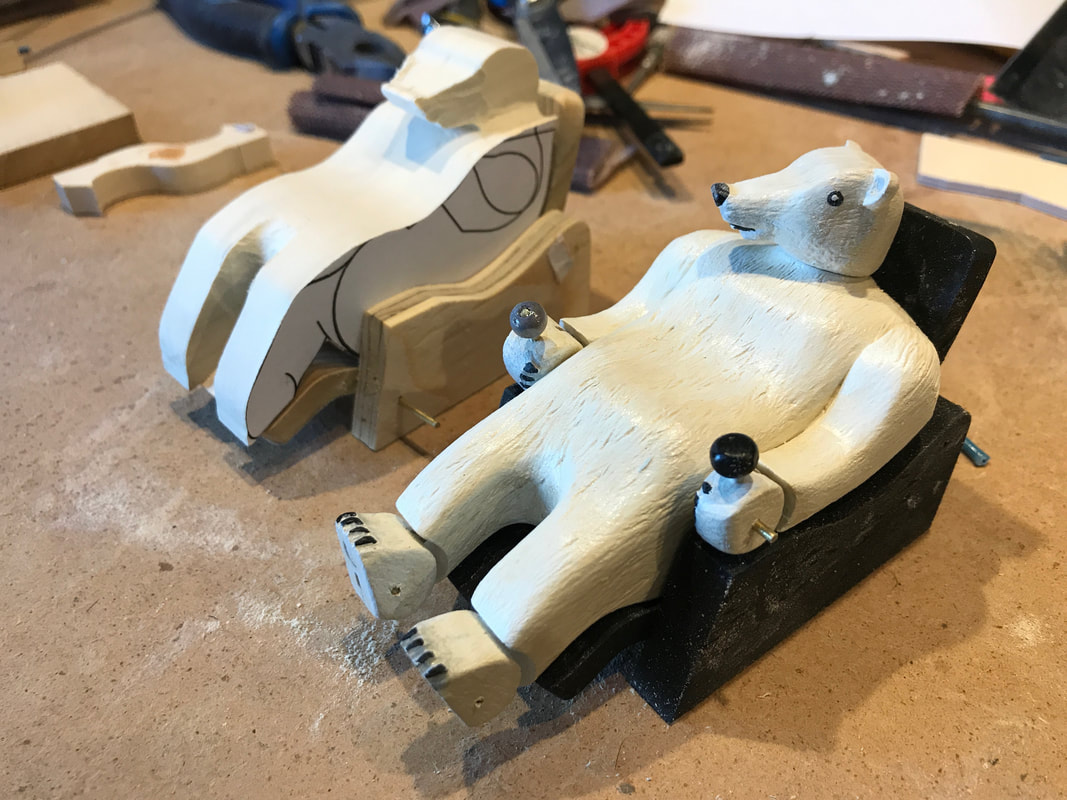 This is the beginning of what I call a recumbent polar bear. He is a real gamer. He sits in a recliner his hands moving joysticks, his feet pumping pedals, and his head moving side to side peering at a yet to be built LCD screen. I am showing you this stage of the process to show you how things come together sometimes. I have already made a quick prototype of the bear, just to scale the whole project and determine the degree of motion to be added to the character. The trick now is to prepare for implementation of the mechanical motions. You need to plan ahead. This photo shows my polar bear before carving features. Having surfaces square and parallel is sometimes essential when creating mechanisms so they must be configured before shaping. The bears hand will move joysticks. The small hole on the top of the hand is for the protruding portion of the joystick. The pin showing is the axis of rotation. There is a brass plate set into the arm, with a hole in it to support the pin, allowing it to spin freely. The movement will be imparted from a rod extending from the bottom of the hand down through the arm of the chair. The feet move in a similar manner, but movement is imparted through a foot pedal from below the floor. The head will swivel on a rod that rises up through the lounger. Of course now comes the challenging part. With the constraints of the mechanism parts defined, the job now is create a passable, recognizable bear, hopefully exhibiting a little gamer attitude! We'll see how it goes. 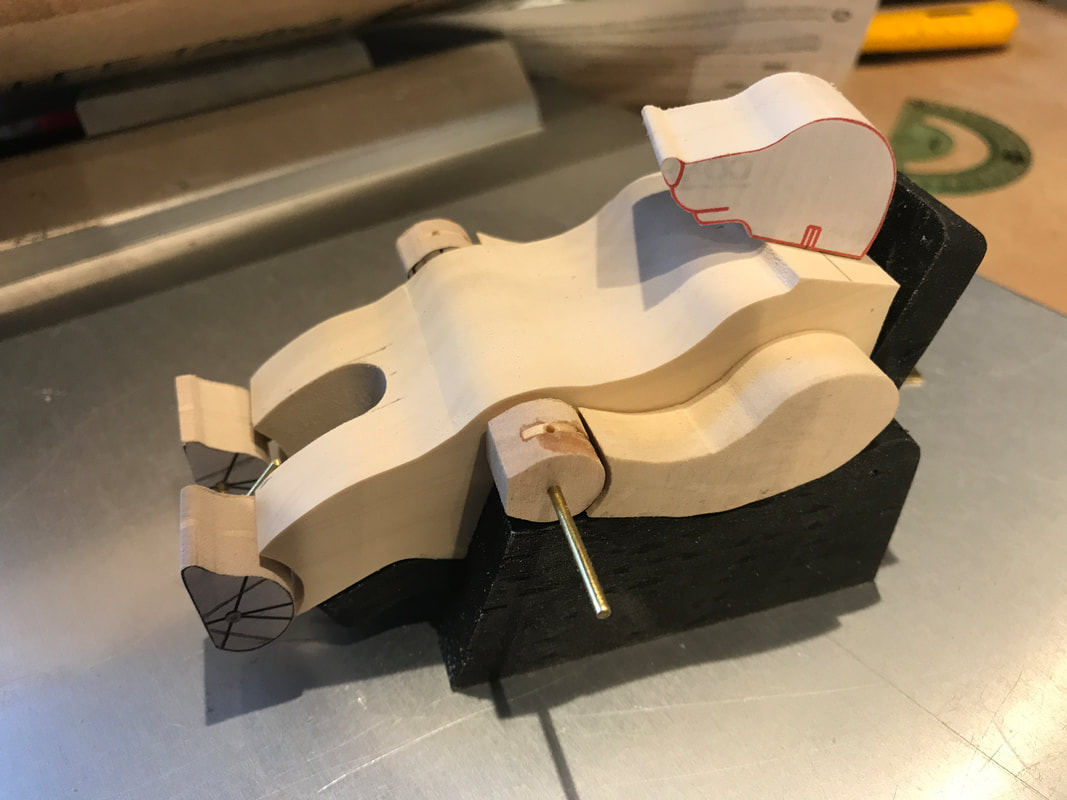 Time for the kick off of the fall season of carving shows! The first is organized by my local club. It is the Kawartha Carving Competition in Bobcaygeon, this coming Saturday, September 14th at the Curling Club. I will not be entering items in the competition but will have a display of automata for demonstration to visitors. The clubs from around South Central Ontario will come to enter carvings and spend the day at the show carving and talking to visitors. Hope to see some of you there!
The competition website is https://www.kawarthacarvingcompetition.org |
Why Automata?Automata is a creative blend of my life interests , engineering, art and woodworking. Archives
July 2022
Categories
All
|
 RSS Feed